

DIY Summer Camp 2023: Make all the things!

Are you ready to sign up for two months of DIY fun? How does DIY Summer Camp work, anyway? Here are the deets!
DIY Summer Camp is on from July 16th - September 9th, 9 weeks of flexing your creativity. During those two months, as a “camper," you'll post a DIY project to your social media using the hashtag #campDIYallthethings once a week. Literally any DIY project. Just make something!
Unlike other DIY challenges, you do not need to be working on remodeling a single space, or complete an entire room during Summer Camp. You certainly can! If you want to use Summer Camp as an excuse to bang out a whole room transformation, AWESOME. But that's not the goal here. DIY Summer Camp is all about just being creative and making things consistently! That could mean you flip a piece of furniture one week, paint a mural the next week, craft some air dry clay earrings, or make some new raised garden beds on a different week… it's all DIY and it's all fair game during Summer Camp!
The real key here is that you nurture your inner artist and allow your curiosity to lead you. The internet and social media can make us feel like we need to "niche down" or focus on one thing and get really good at it. For me, my main audience is DIY Home Renovation, but I know that my creativity wants to spread it's wings a bit, so by letting myself do things that don't fit into the little box of "Home Reno," I'm actually fueling the fire of my

creativity and allowing my brain to explore ideas that I wouldn't have if I stayed in that single niche.
So this summer, DIY Summer Camp is all about loosening up the reins, honoring the tides of your creativity and letting yourself play!


DIY Hog Panel Trellis
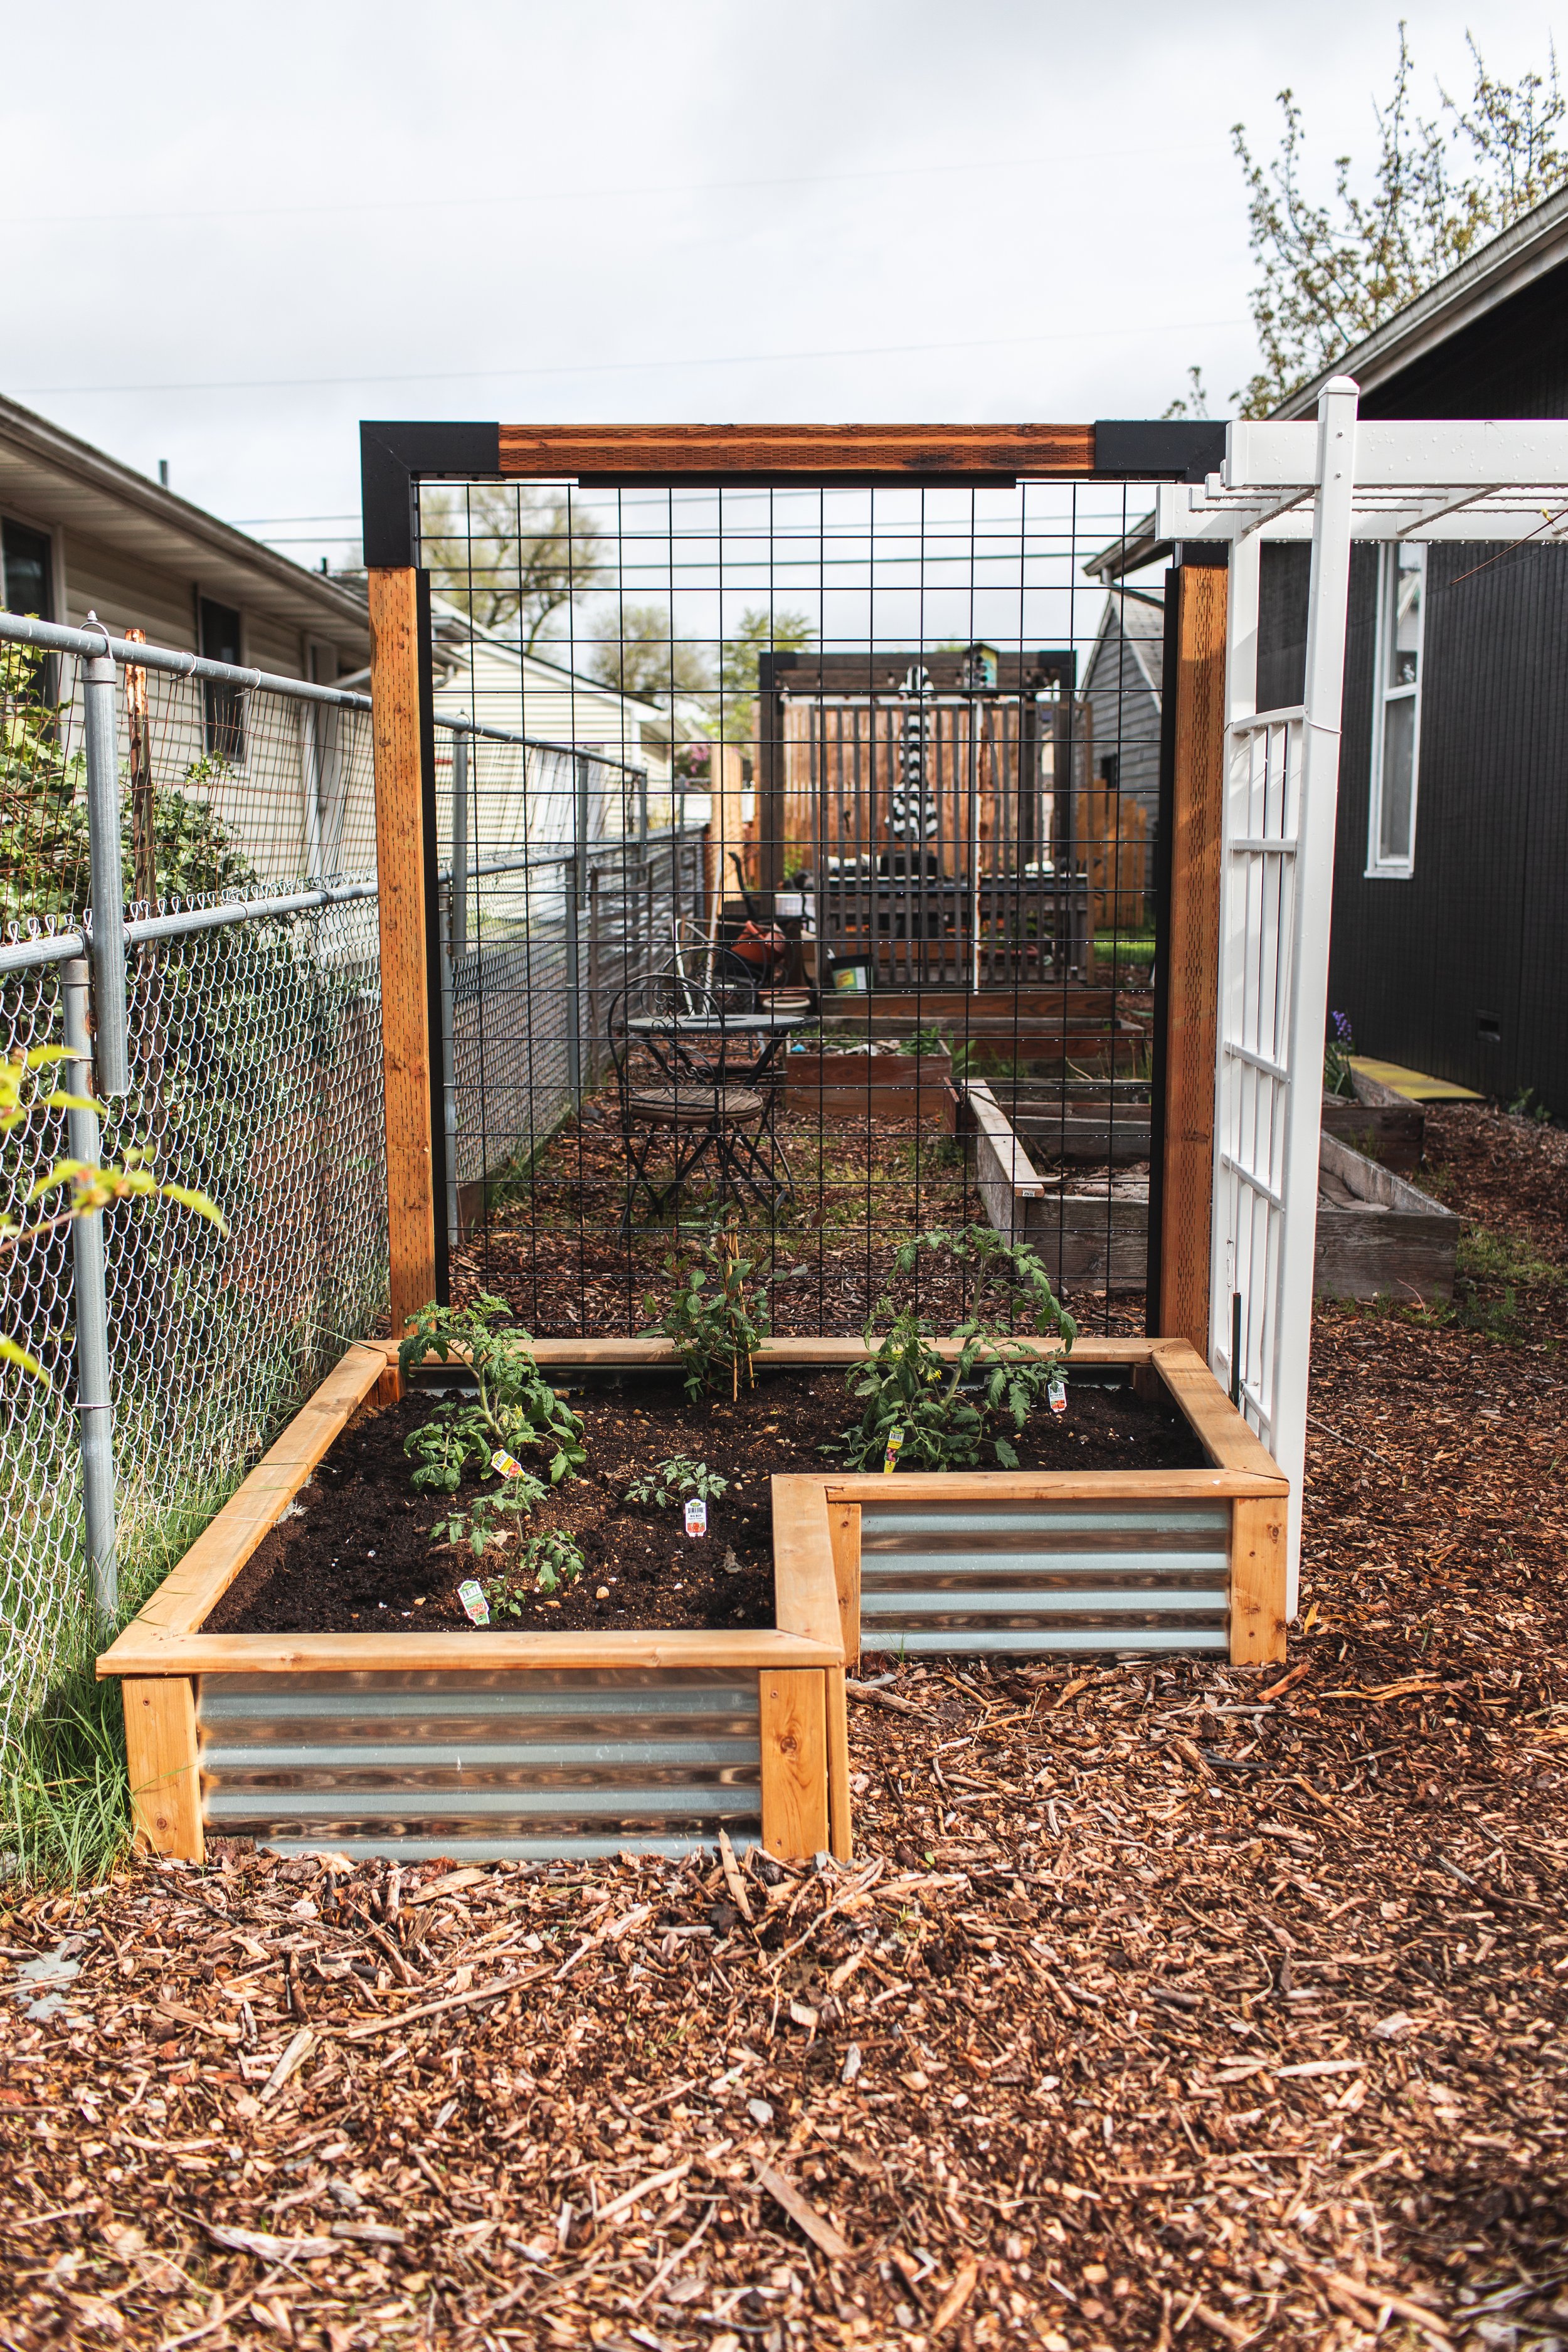
Over the past three years, I’ve slowly built and added on to our garden, and now that the essential layout and garden beds are done, I’m moving on to fleshing it out with elements that help define the space and give it a cozier feel. When we bought this house, it really just felt like the house was dropped onto a totally empty lot with no landscaping to speak of, so adding in things that help the house feel integrated with the land and neighborhood has been part of our long-term exterior goals.
I’ve spent a couple years building raised beds for our vegetable/pollinator garden, but last year when I built the patio and pergola area in the back of our house, I realized that you could see all the way to that area from the front, so I wanted to create a little more privacy, with something for climbing plants to vine on. While I was walking the aisles of Home Depot, I saw a garden bed trellis made with Wild Hog fence panels and I knew that would be the perfect solution, since we already had garden beds right where I wanted trellis to go.
I’d built the pergola last year using LINX brackets and Wild Hog fence panels, so I was familiar with and loved those products already, so using them to create this trellis situation seemed like the perfect fit.
What you’ll need:
Materials (per 3.5 x 6.5 ft trellis):
2- 10ft 4x4 treated lumber
1- 8 ft 4x4 treated lumber
1- 36x72in Wild Hog Panel
1- 6ft Wild Hog Tracks kit
2- 4x4 LINX L-Fit Brackets
4- 3in Exterior Wood Screws
Gravel or Concrete for setting posts
Tools:
Circular Saw
Impact Driver/Drill
Angle Grinder
Tape Measure
Speed Square


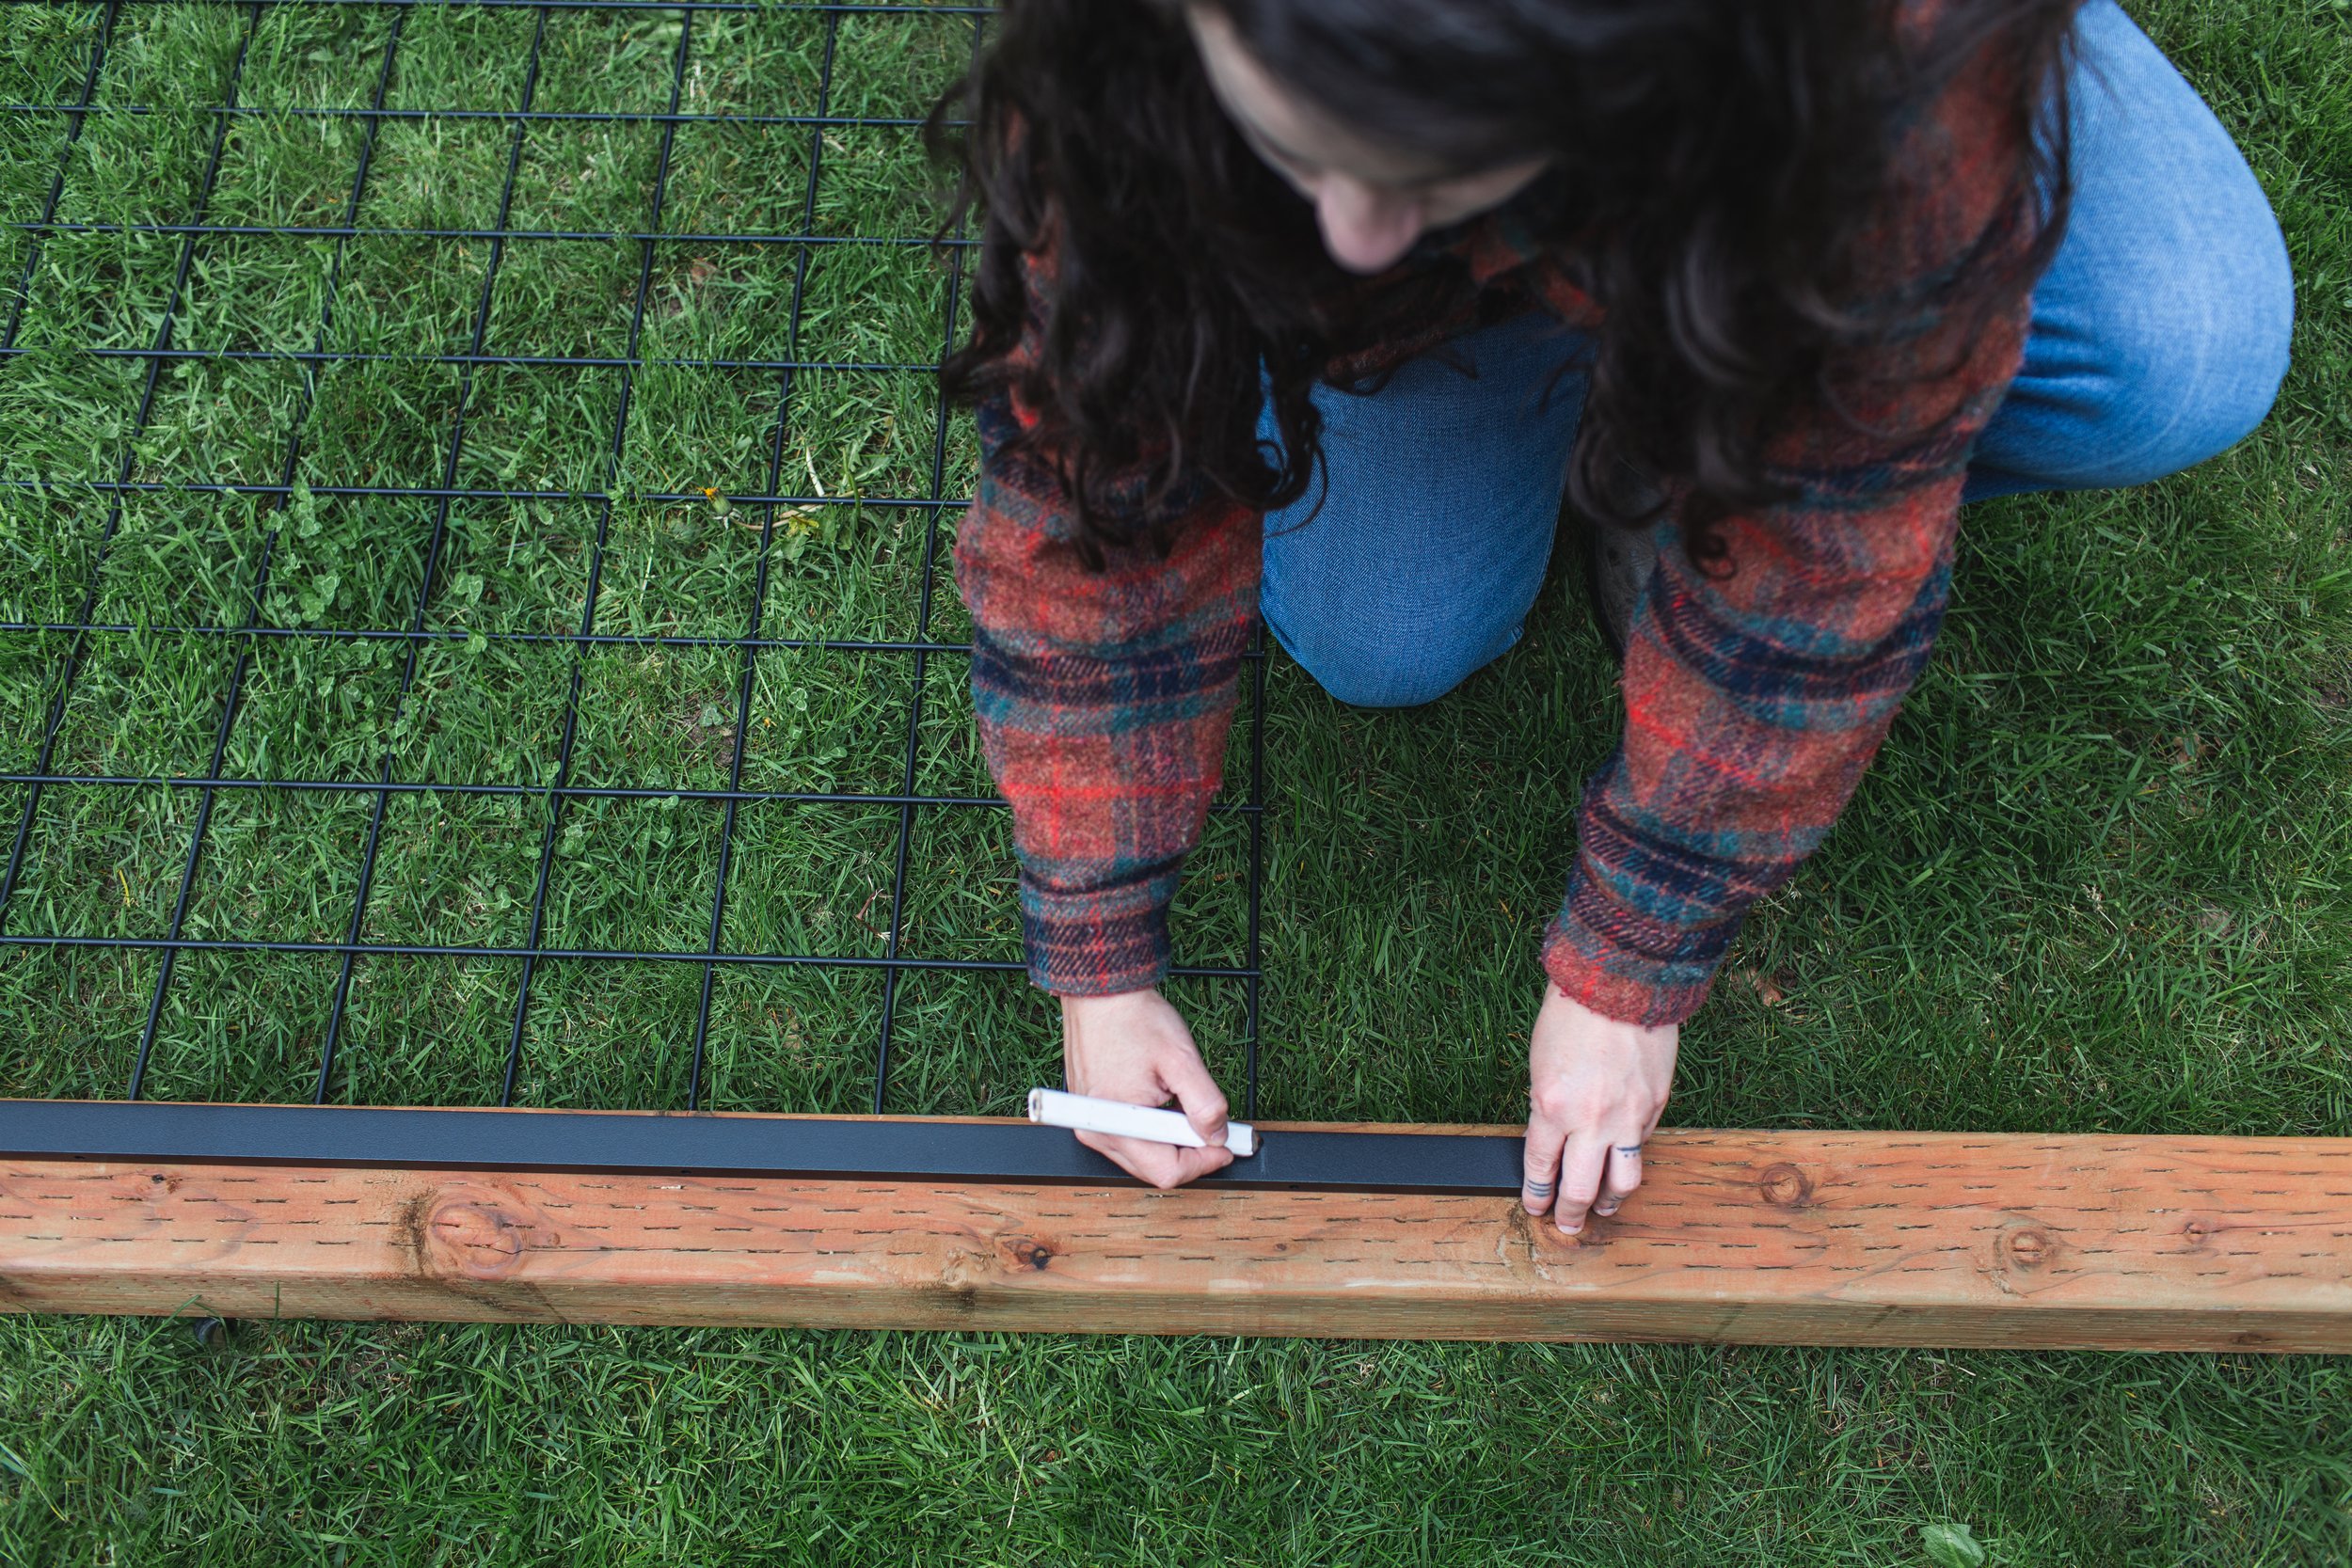
Start by inserting one of the 10ft 4x4s into the first LINX L-Fit brackets. Make sure the 4x4 goes all the way in, so that when you look inside from the other side, you see it fully inserted. Then slide in the 8ft (for the 36in wide panel, or 6ft for the 60in wide panel) 4x4, so that its inserted fully and touches the 10ft 4x4 you’ve already inserted.
Lay your Wild Hog panel in the middle where it will eventually go, with about a 1/4 - 1/2 in gap on all sides. Mark the width of that top 4x4 using your speed square, remove from the bracket, and cut on your mark.


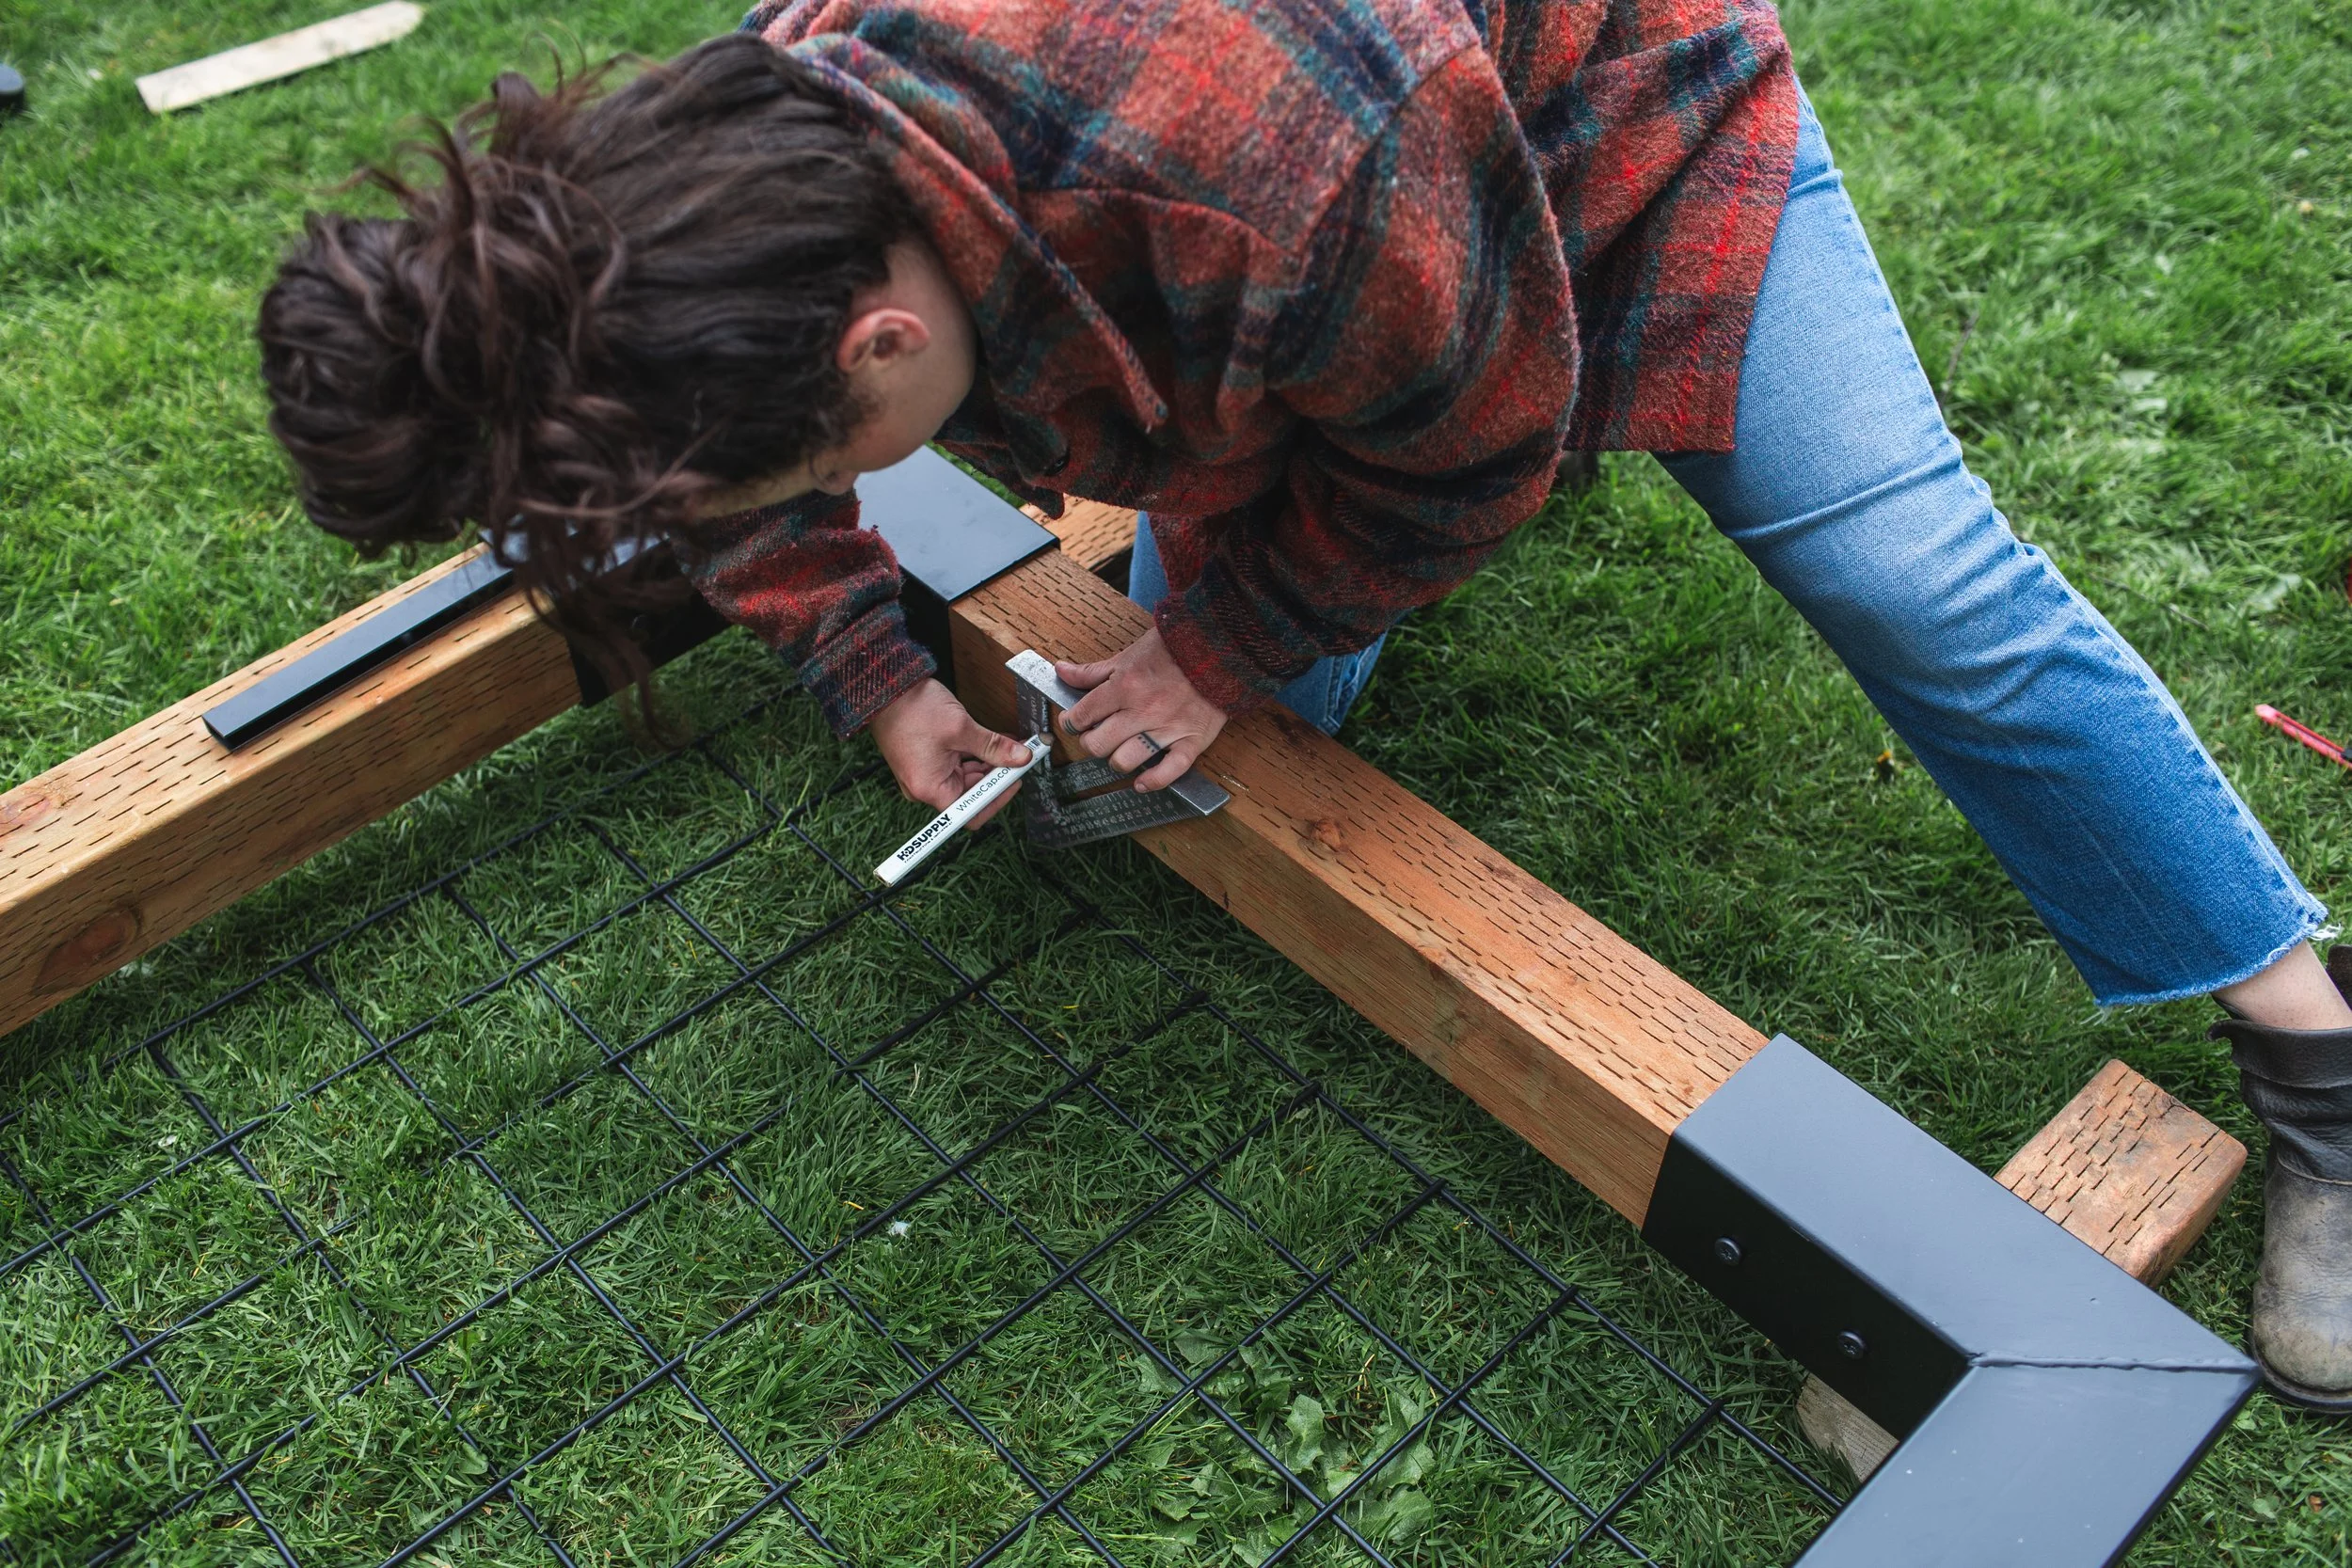
3. Insert the other 10ft 4x4 to the second LINX bracket, then reinsert the top 4x4 you just cut, then secure the brackets using the screws provided with the LINX brackets.


4. Open your Hog Track kit, you’ll have two 3ft tracks and two 6ft tracks. If you’re building a trellis using 36in wide Wild Hog Panel, you’ll need to cut the 3ft track to fit between the LINX Brackets (you won’t need to do this for the wider trellis using the 60in panel). You’ll also need to cut the excess off the bottom of the 6ft tracks to fit between the bottom of the LINX bracket and the bottom of the panel.
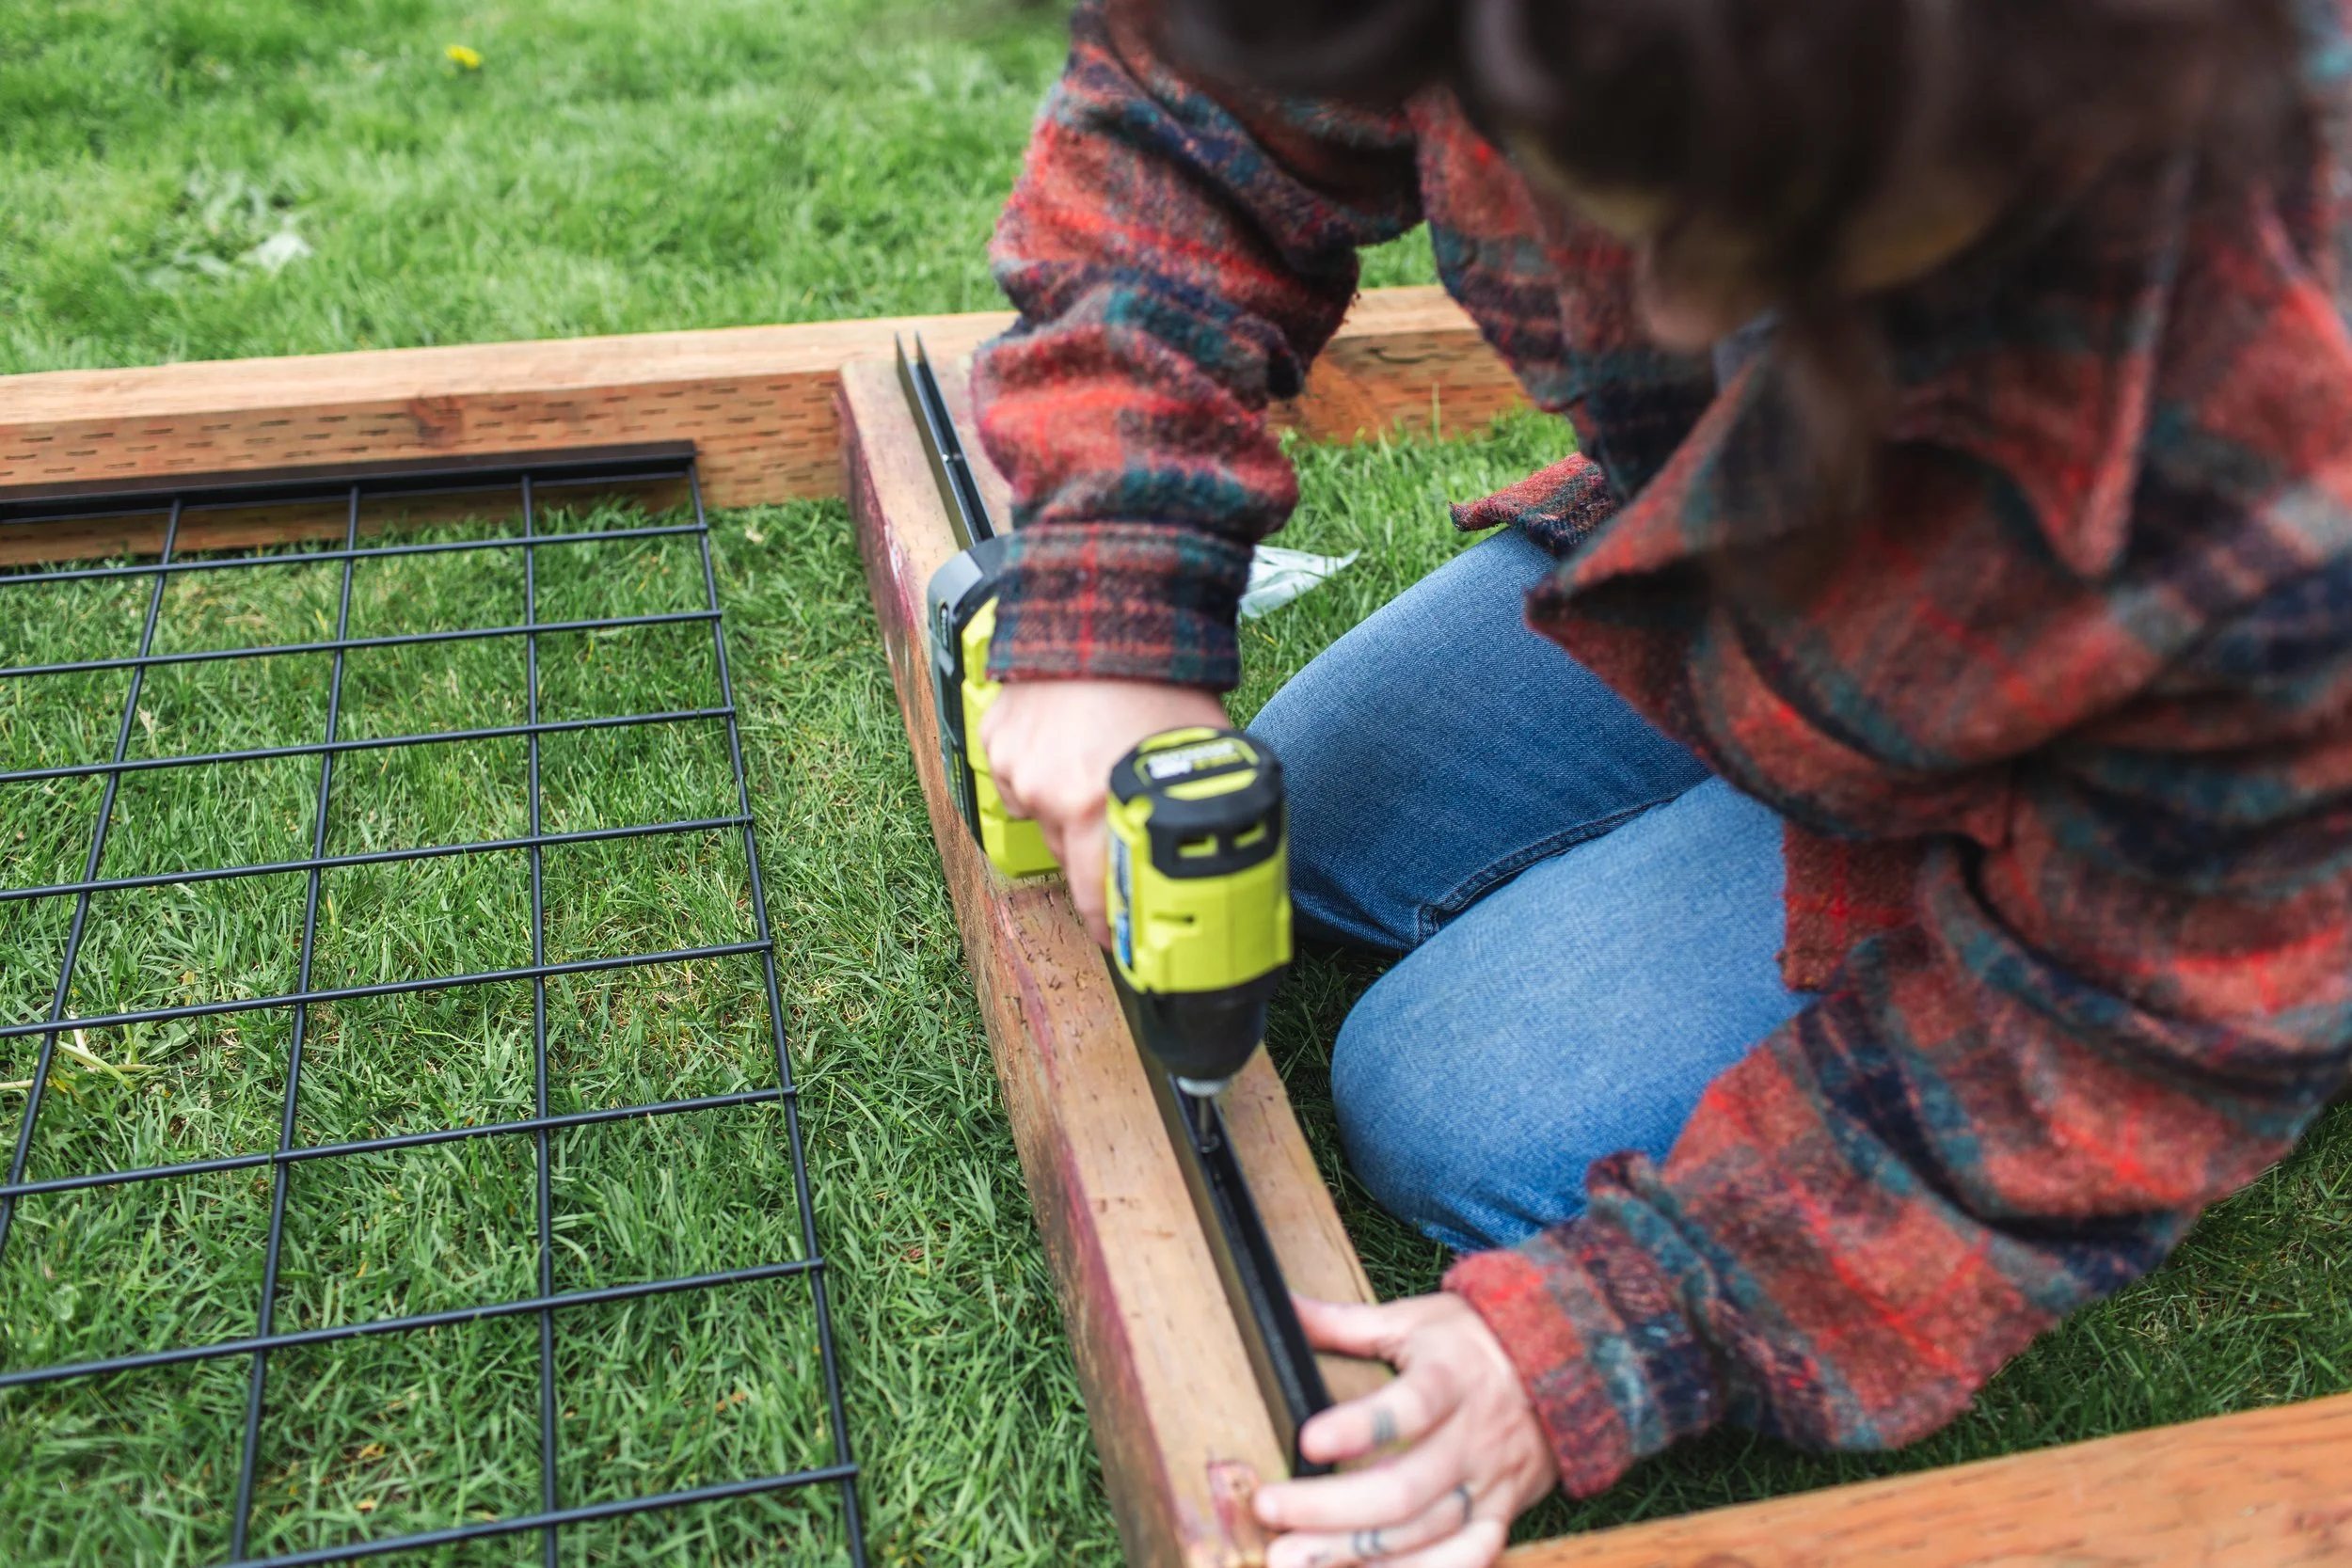
5. Cut the tracks using your angle grinder, then spray the cut end with black spray paint.


6. Mark the center of all of your 4x4s at 1 3/4in, this is where you’ll install the hog tracks. I used my speed square, holding my pencil at 1 3/4 and sliding the base of the square along the edge of the 4x4.
7. Using the provided screws, attach the Hog Tracks along this line.

Repeat this process for each side.


8. With the three sides installed, slide your panel in all the way. Once the panel is in, you can build and install the bottom piece.

9. Measure the inner width between the upright 4x4s and cut your final section of 4x4 to fit. If you’re making a trellis using the 36in panel, you’ll need to cut about 1in off your final 3ft Hog Track, so it will fit between the vertical Hog Tracks on either side. Again, mark the center of the 4x4, and install that Hog Track. You can then slide this up so the panel slips inside that bottom track.
10. Secure this bottom piece by toenailing in using 3in exterior screws.


11. At the location where you’re going to install your trellis, measure and mark where the posts will go. Using a post hole digger, dig a hole about 38-42in deep.
12. Place about an inch or so of gravel in the base of the hole, then (with a friend— these trellises are heavy!) slide the trellis posts into the holes.


13. You can secure this trellis either using quick-setting concrete, or I simply filled in around the posts using gravel. Since my garden plan is constantly in flux, I wanted to make sure I had the option to move these in the future if my plans change, and gravel keeps them secure without making them 100% permanent.


If you’re also wanting to build some of these corrugated metal raised beds, they’re one of my favorite budget-friendly and (IMHO) cool-looking garden beds. You can find my tutorial for those here!
Our existing arbor that you can see is a Home Depot find, I’m not finding the exact model but you can see a very similar one here.


How to use photoshop to create interior design mockups and mood boards

Learning how to create beautiful mood boards and project mockups is a great way to not only gain clarity on your own personal projects, but offer visual proof of concept of projects for clients, if you’re a designer, or potential sponsors, if you’re a content creator. While I love to create mockups for my own projects in order to feel out colors and design ideas, they also are a perfect thing to send alongside a pitch to a brand when I’m seeking a sponsorship. I find they are a great way to test out different paint colors or wallpapers, and get a feel for how something will look IRL. I generally like using image based mockups using actual photos of the space better than doing 3D computer renderings because they feel more real to me, especially if you’re keeping the existing structure of a space and aren’t moving walls or anything that would be more difficult to adjust from a photo. Mood boards are a great starting place for putting together a general design vibe, to see how different colors and textures will look together.
There are other programs besides Adobe Photoshop you can use to create mood boards and mockups, like Canva, but I’ve been using photoshop since 2004 and have never used Canva, so this tutorial will use Photoshop, however the same principals would apply to any program you use, the tools just may be different within different photo editing applications.


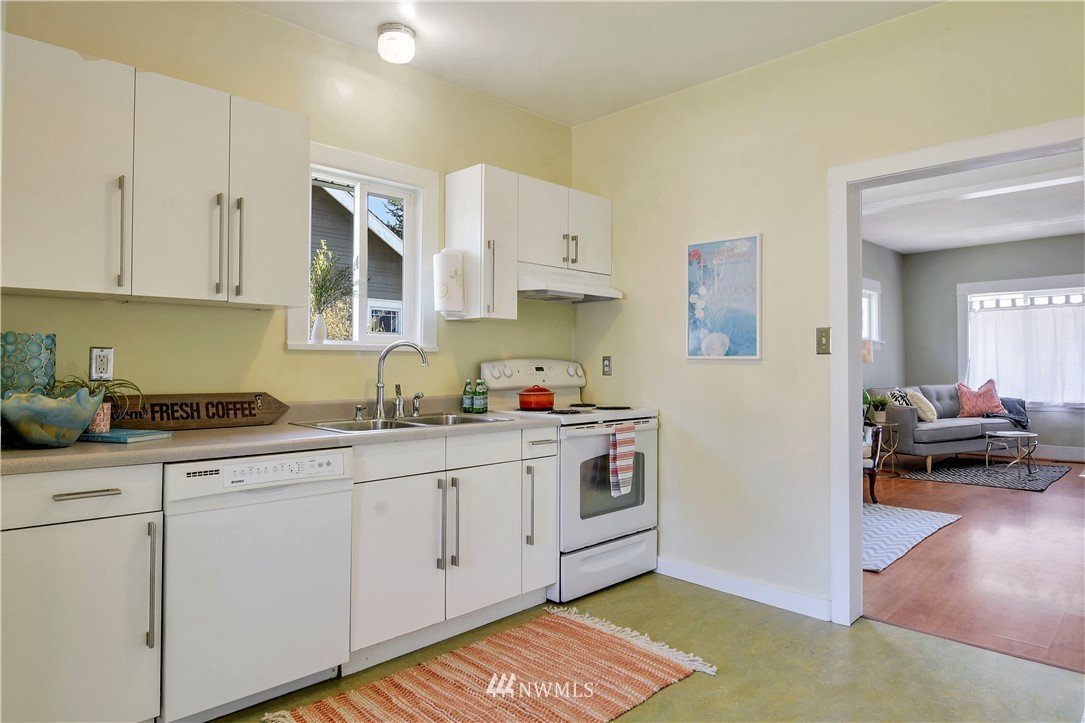
I find that, if you have access to them, the real estate photos of your space can be really nice to work with because they’re generally taken when the space is empty or very clean, so you don’t have to edit around a bunch of furniture or the clutter of daily life. But if you don’t have access to those images, you can start with images you take yourself.
The tools I use the most to create mockups are the background removal tool and the distort transform tools. The background removal tool is nice because you don’t have to remove the background of what your adding to the space. I grab a lot of product images from online to use in my mockups, and those generally have white backgrounds, which is easy to remove.
The distort transform tool is how you’ll fit that product image to your background so it matches the perspective of the space. It sometimes takes a little playing around to get things to feel cohesive, perspective-wise.
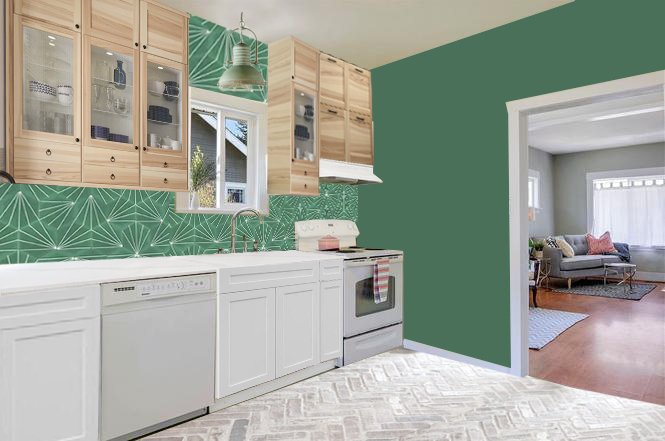
The other tools I use a lot are the clone tool, and the polygonal lasso tool. For the above image, I used the polygonal lasso tool to select that wall around the doorway and then used my paint bucket tool to fill it in with green to “paint” that wall green. When I added the tile to the backsplash, I added the tile to the whole plane of that wall, then used my polygonal lasso tool to select where the cabinets were and deleted so that the tile only showed where the tile should be.

The clone tool is nice because you can fix spots, like in the deck mockup, I fixed the dead spots in the grass, removed junk like the wheelbarrow and hose, etc.
The below image is the same image as the empty one you see here. The ceiling, bookshelves, furniture, fireplace, etc are all added in photoshop!


Mood boards are much quicker to put together, you’re really just taking images and putting them together on one “page” kind of like how you would if you cut things out from magazines and glued them all onto a pieces of paper. The main tools I use for this are the background remover tool, or the magic wand tool (if the background remover tool doesn’t do what you’re wanting you can use the magic wand tool or polygonal lasso tool to remove the background by selecting and deleting). Then you just arrange and layer things how you want. I like to include some inspiration images of spaces as well, which helps tie everything together.
If you want to start making mockups and moodboards, start simple by changing the paint color of a wall! Something like the deck mockup has a ton of layers and is more involved, but starting simple by changing a wall color or adding a tile backsplash is a great place to practice using the different tools photoshop has!

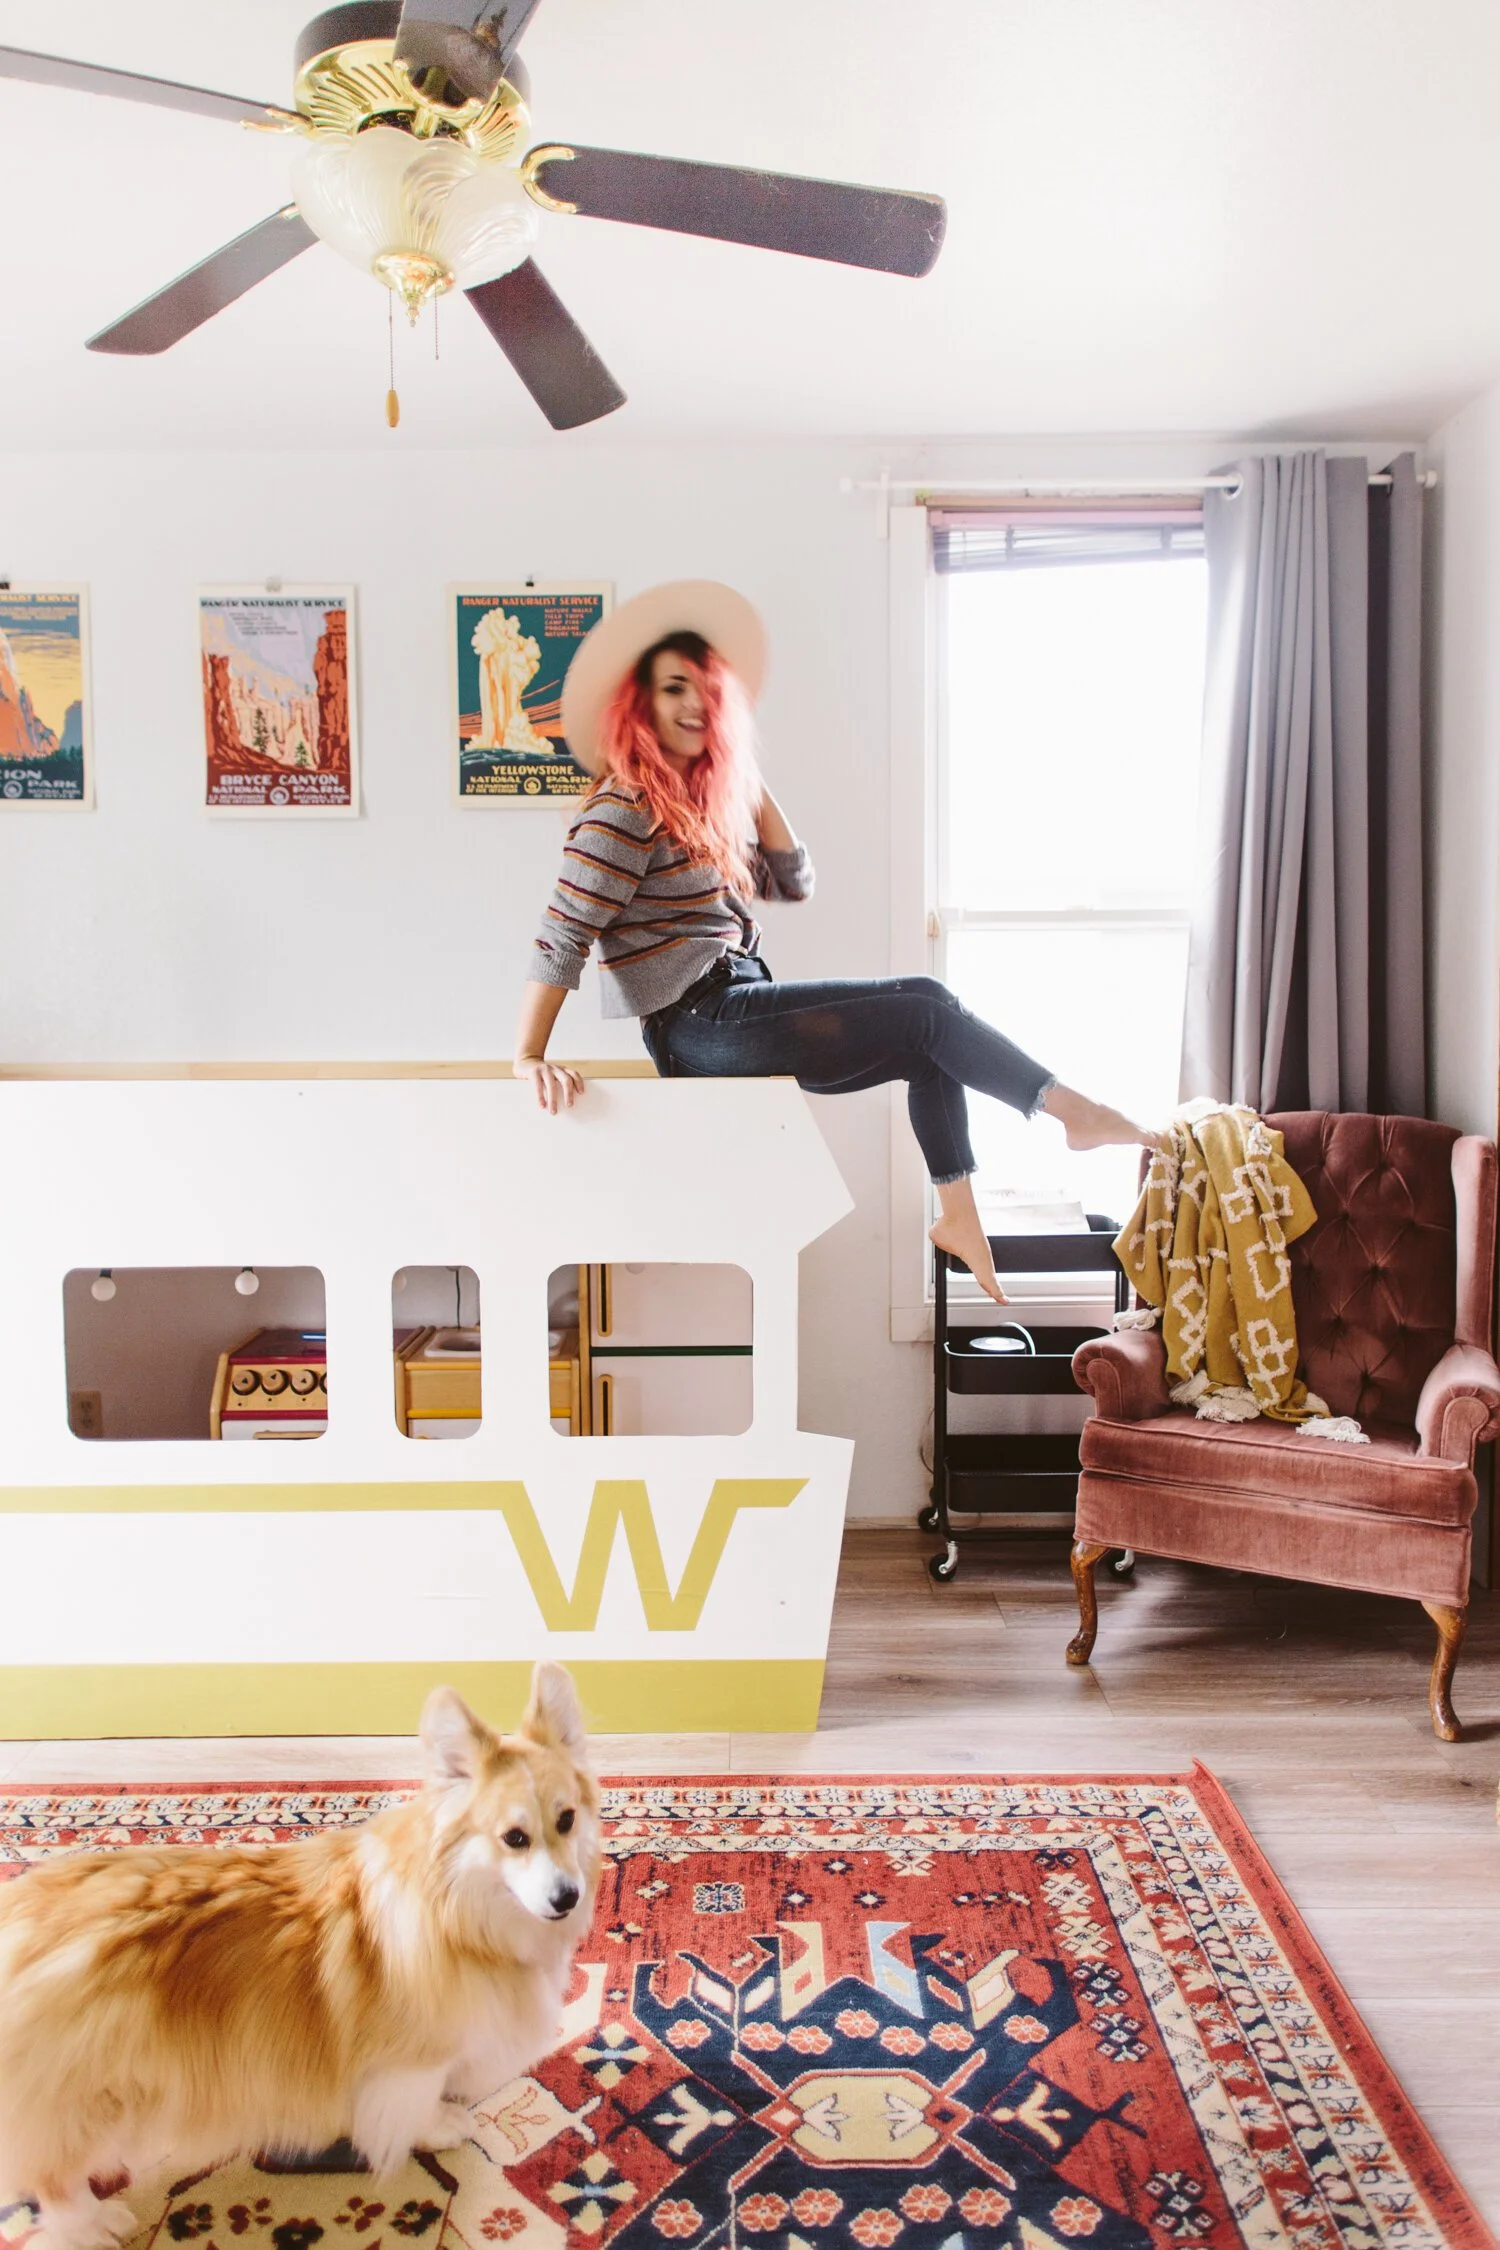
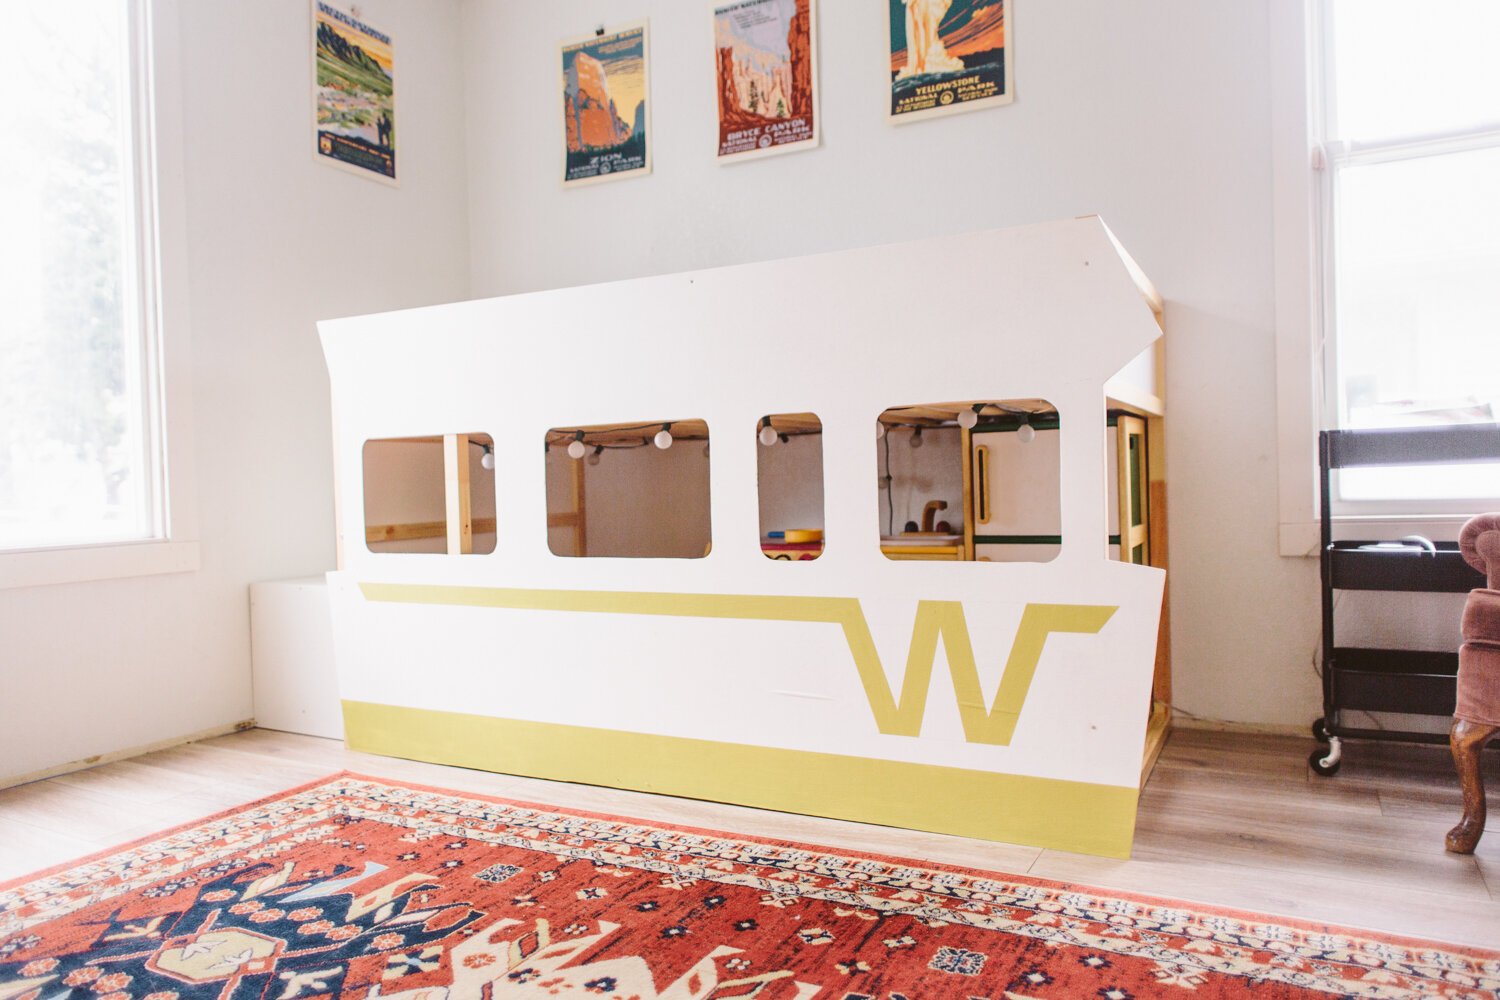
DIY Vintage Winnebago Kids Bunk Bed
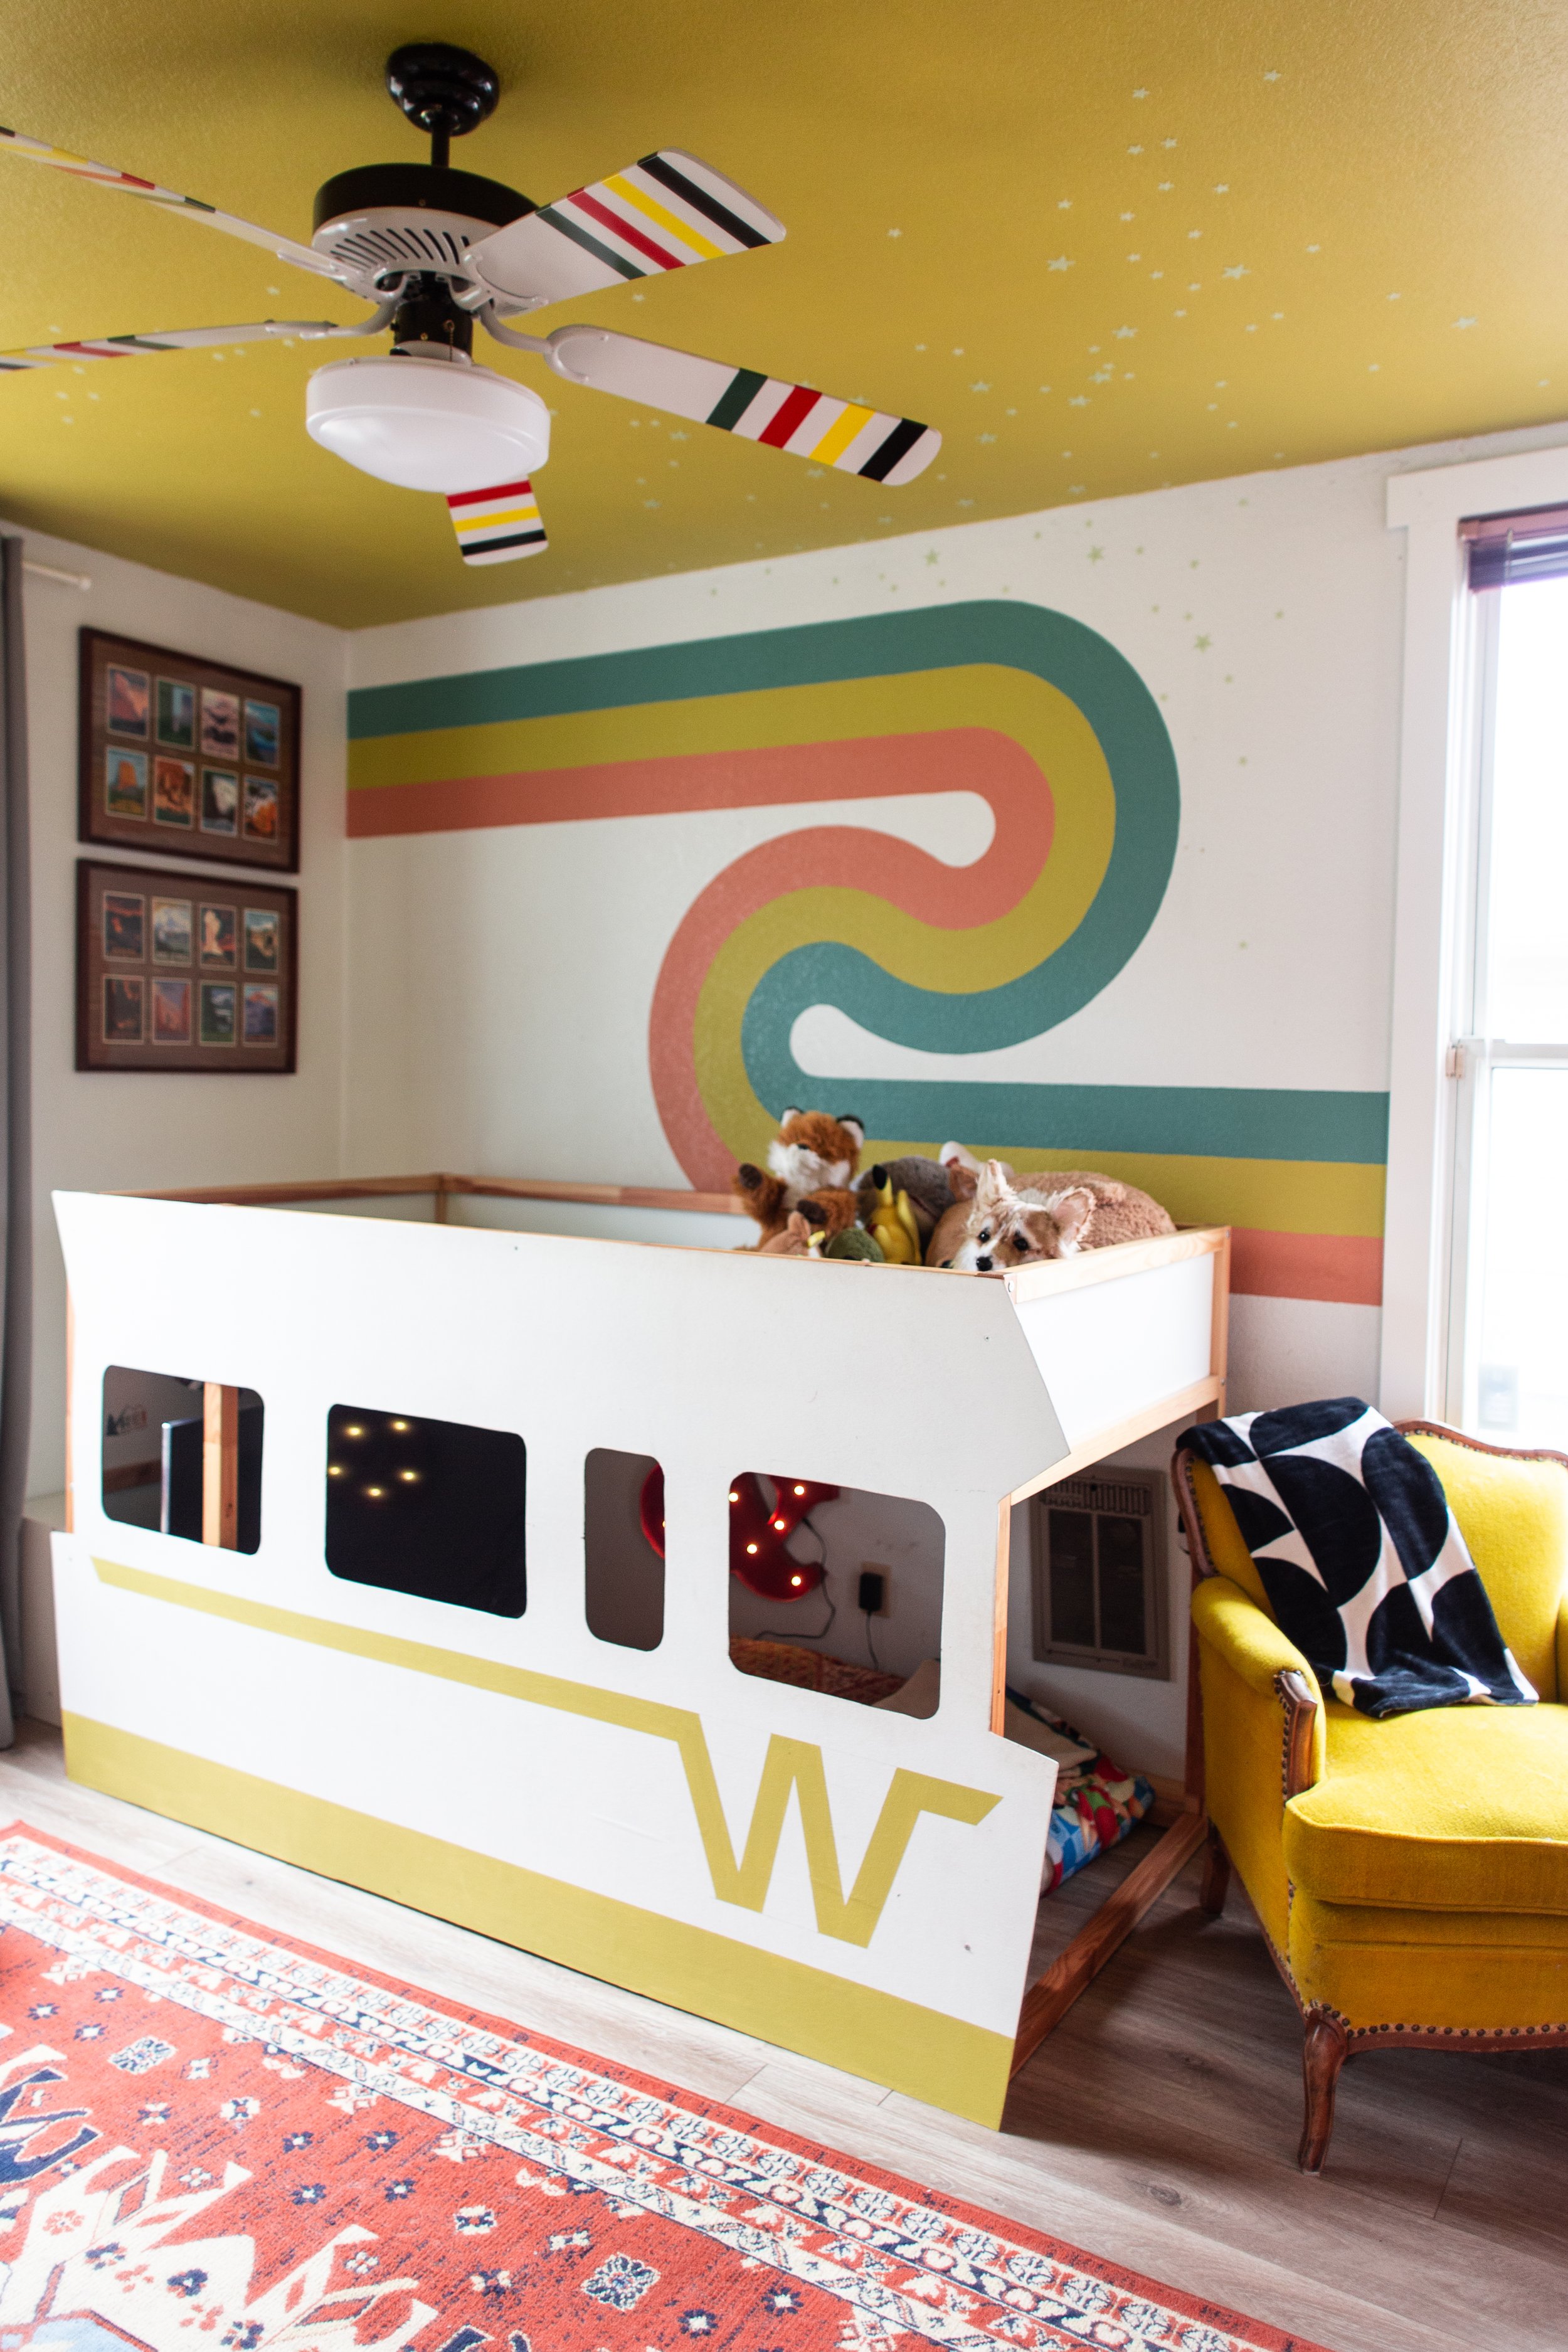
Jack’s little Winnie bunk bed is hands down one of my favorite (and one of my easiest) DIY projects. You could obviously use this method to create any number of cool shapes— I made a version of this as a submarine for a local preschool— but I thought it would be so fun to give Jack a kiddo version of my grown-up-real-life Winnebago Brave.
Here’s what I used for this project:
Materials:
1/8 in 4x8ft Utility Panel
3/4 in screws
Finish Washers
White and Yellow Paint
Ikea Kura Bed
Ikea Trofast Shelf
Tools:
Impact Driver/Drill
Circular Saw
Jigsaw

Here’s the diagram for all the measurements I used to cut and paint mine. These measurements will fit the Kura bed, but you may need to modify if you’re using a different base bed (though it shouldn’t be too much different since it’s a standard twin size bed length).
Cut out your plywood panel using the measurements. I used a circular saw for the larger straight cuts and then a jigsaw for the interior window cuts.
Paint two coats of white on the whole thing (you could do both sides, but I left the inside raw wood).
Use masking tape to mask off the RV stripes and paint two coats of yellow (or whatever color you prefer)
Attach the RV panel to the Kura bed using screws and finish washers. You can touch up paint over the screws to help them look less obvious. I did a few along the top, and a few along the bottom.
That’s it! On mine, I covered up the area on the bed where the ladder goes with the RV panel, so I used the Trofast shelf as a set of stairs so Jack could climb up to the bed. I initially had a play kitchen inside so it felt like a real mini RV, but now that Jack is a little older and the play kitchen isn’t his speed, we turned it into a little gaming den where he can play Minecraft with Dan. Super cute!


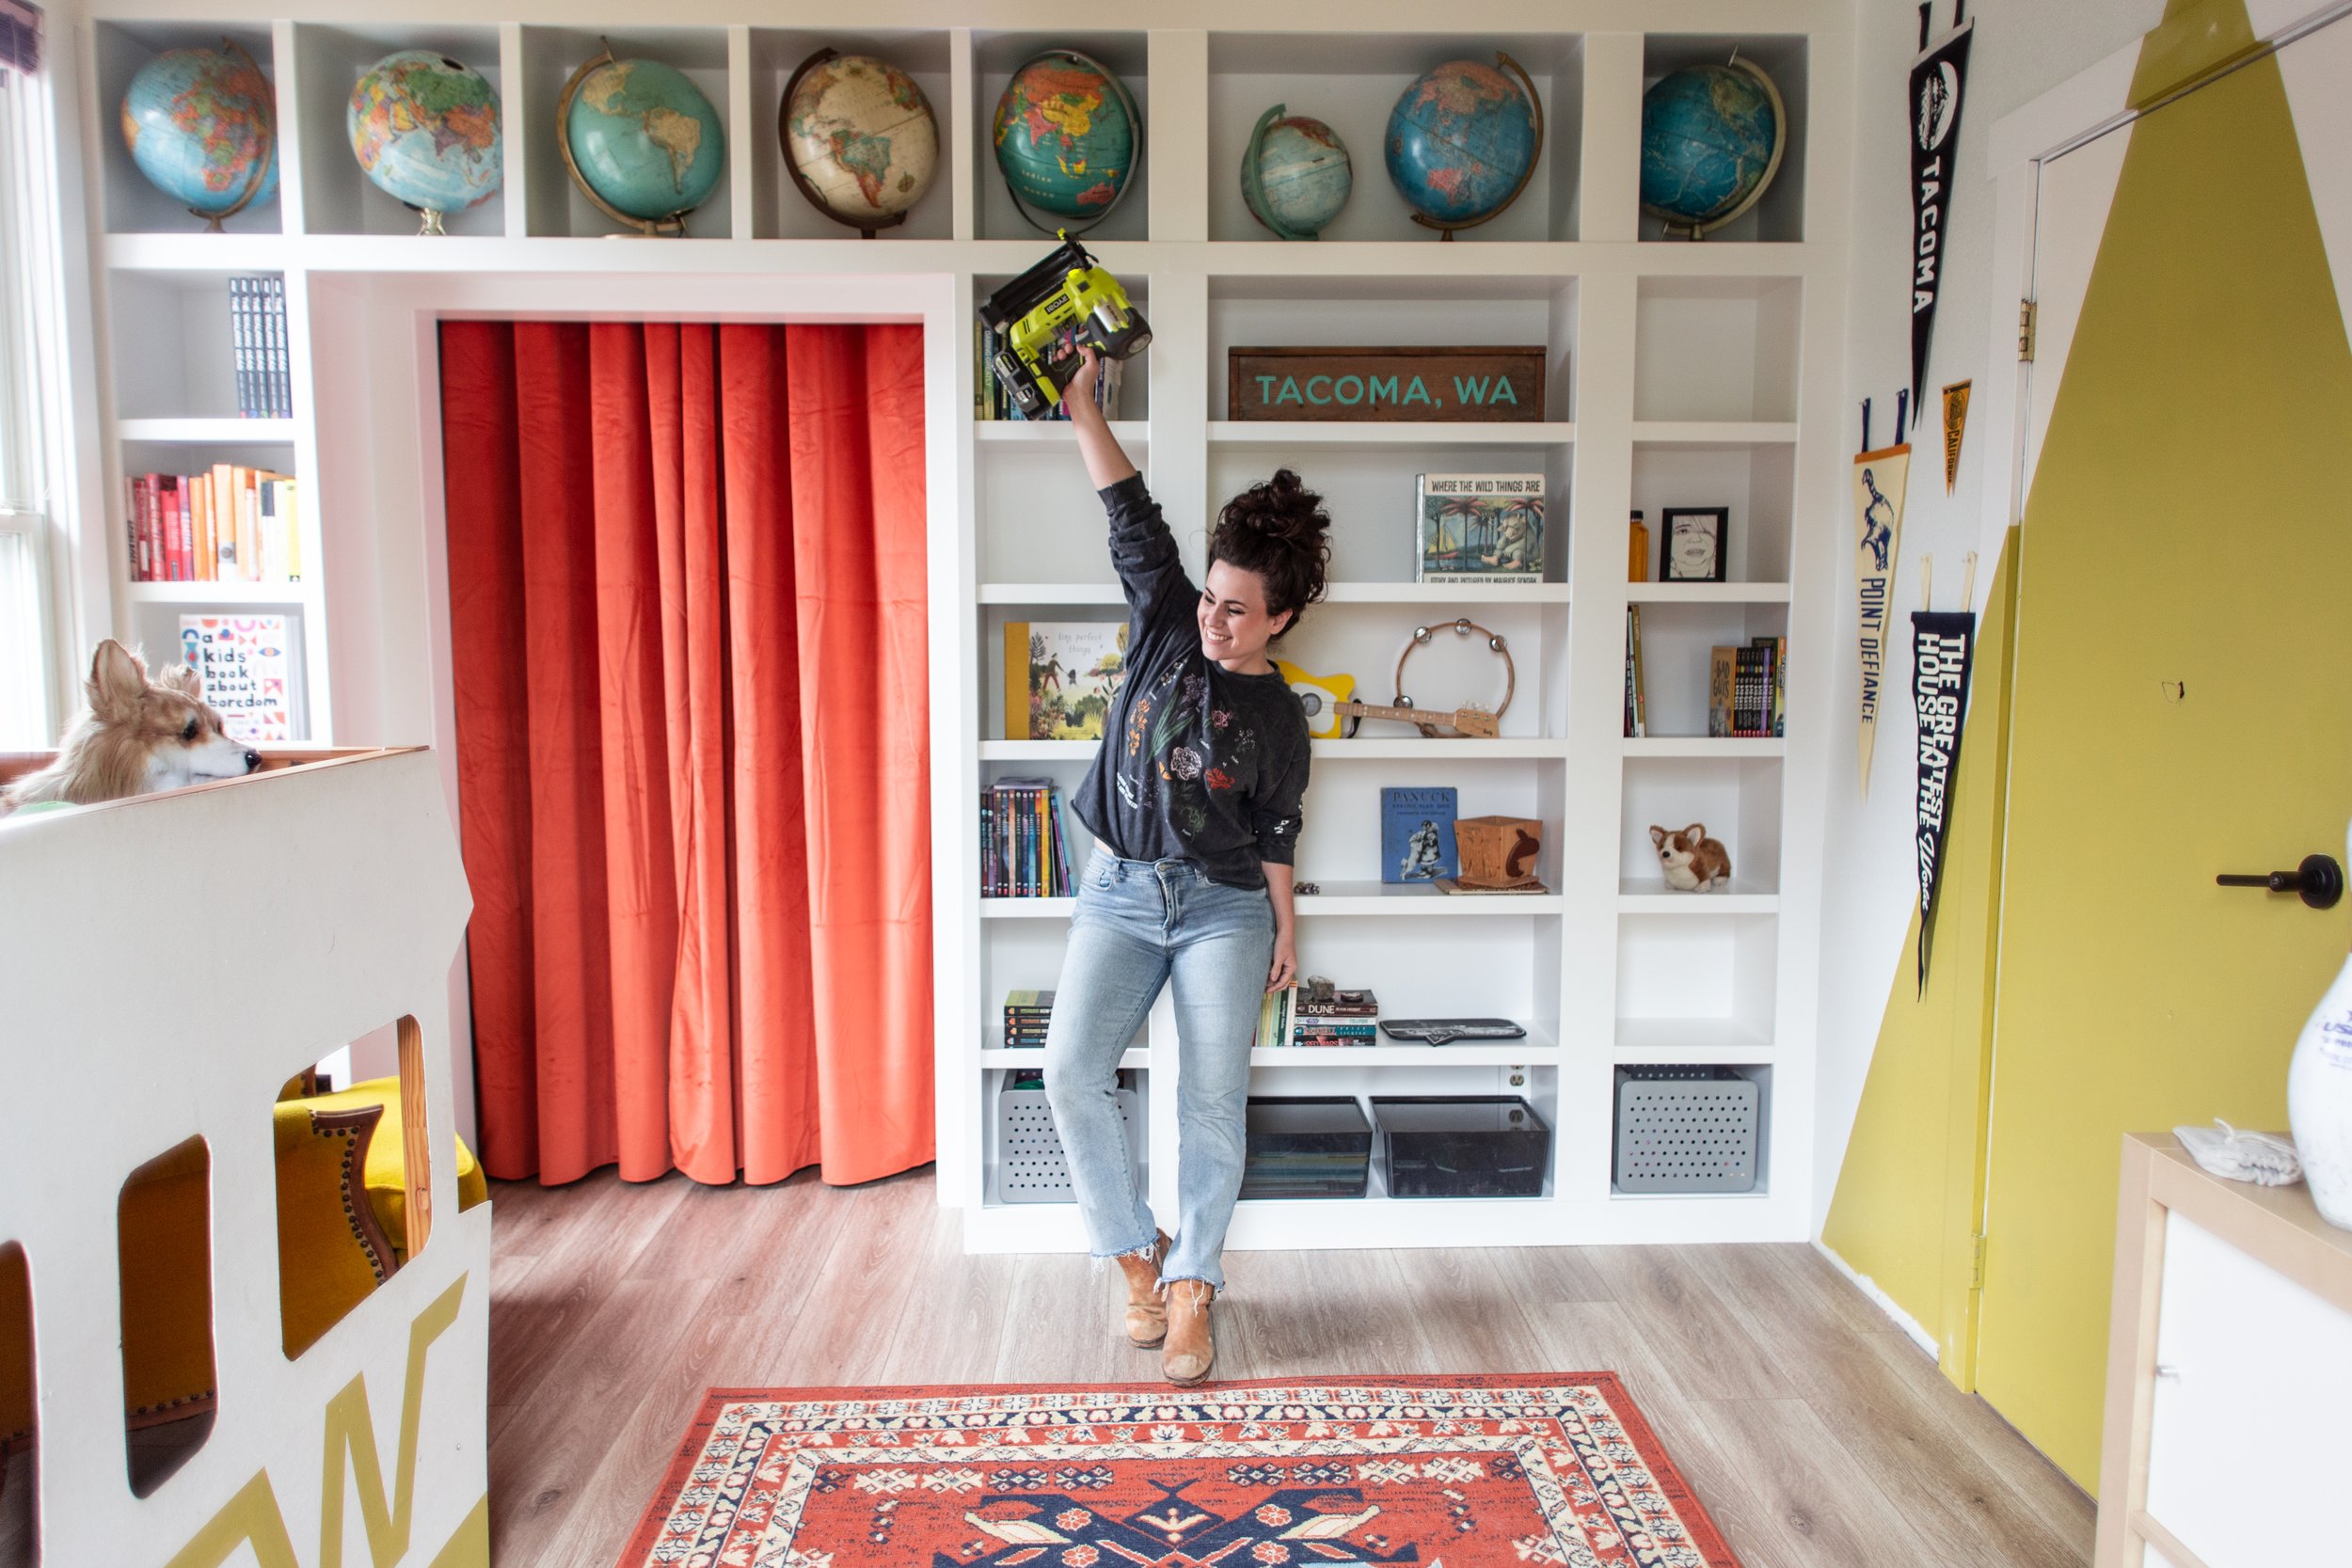
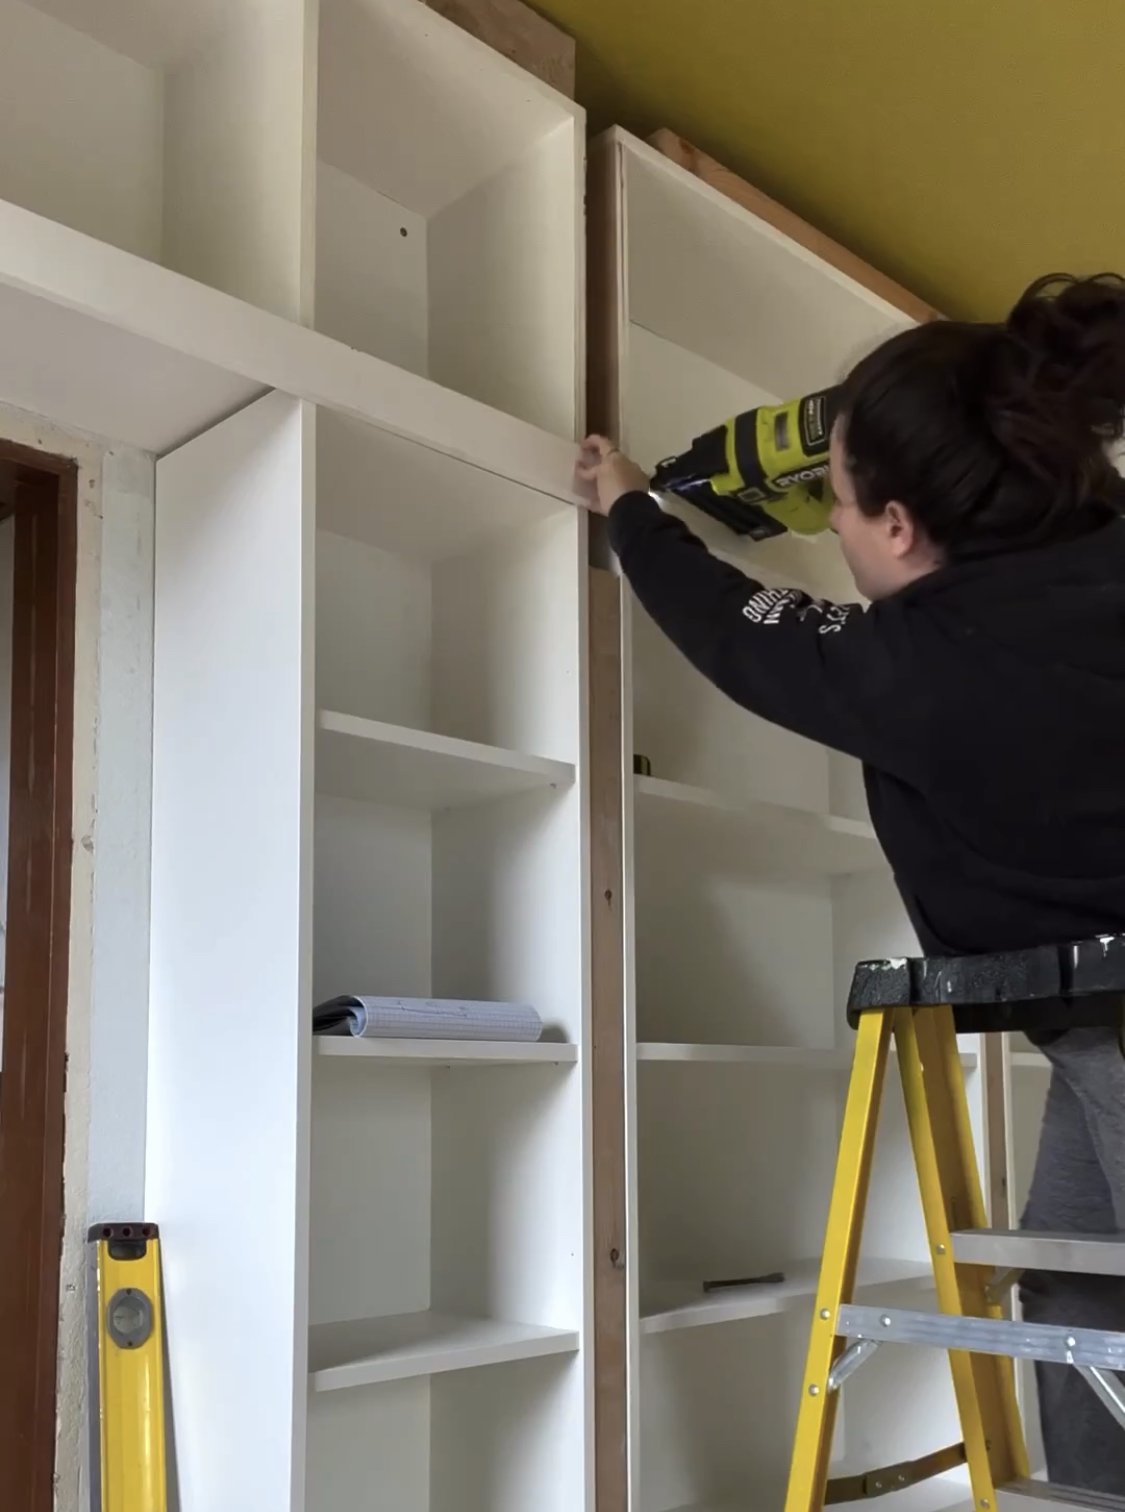
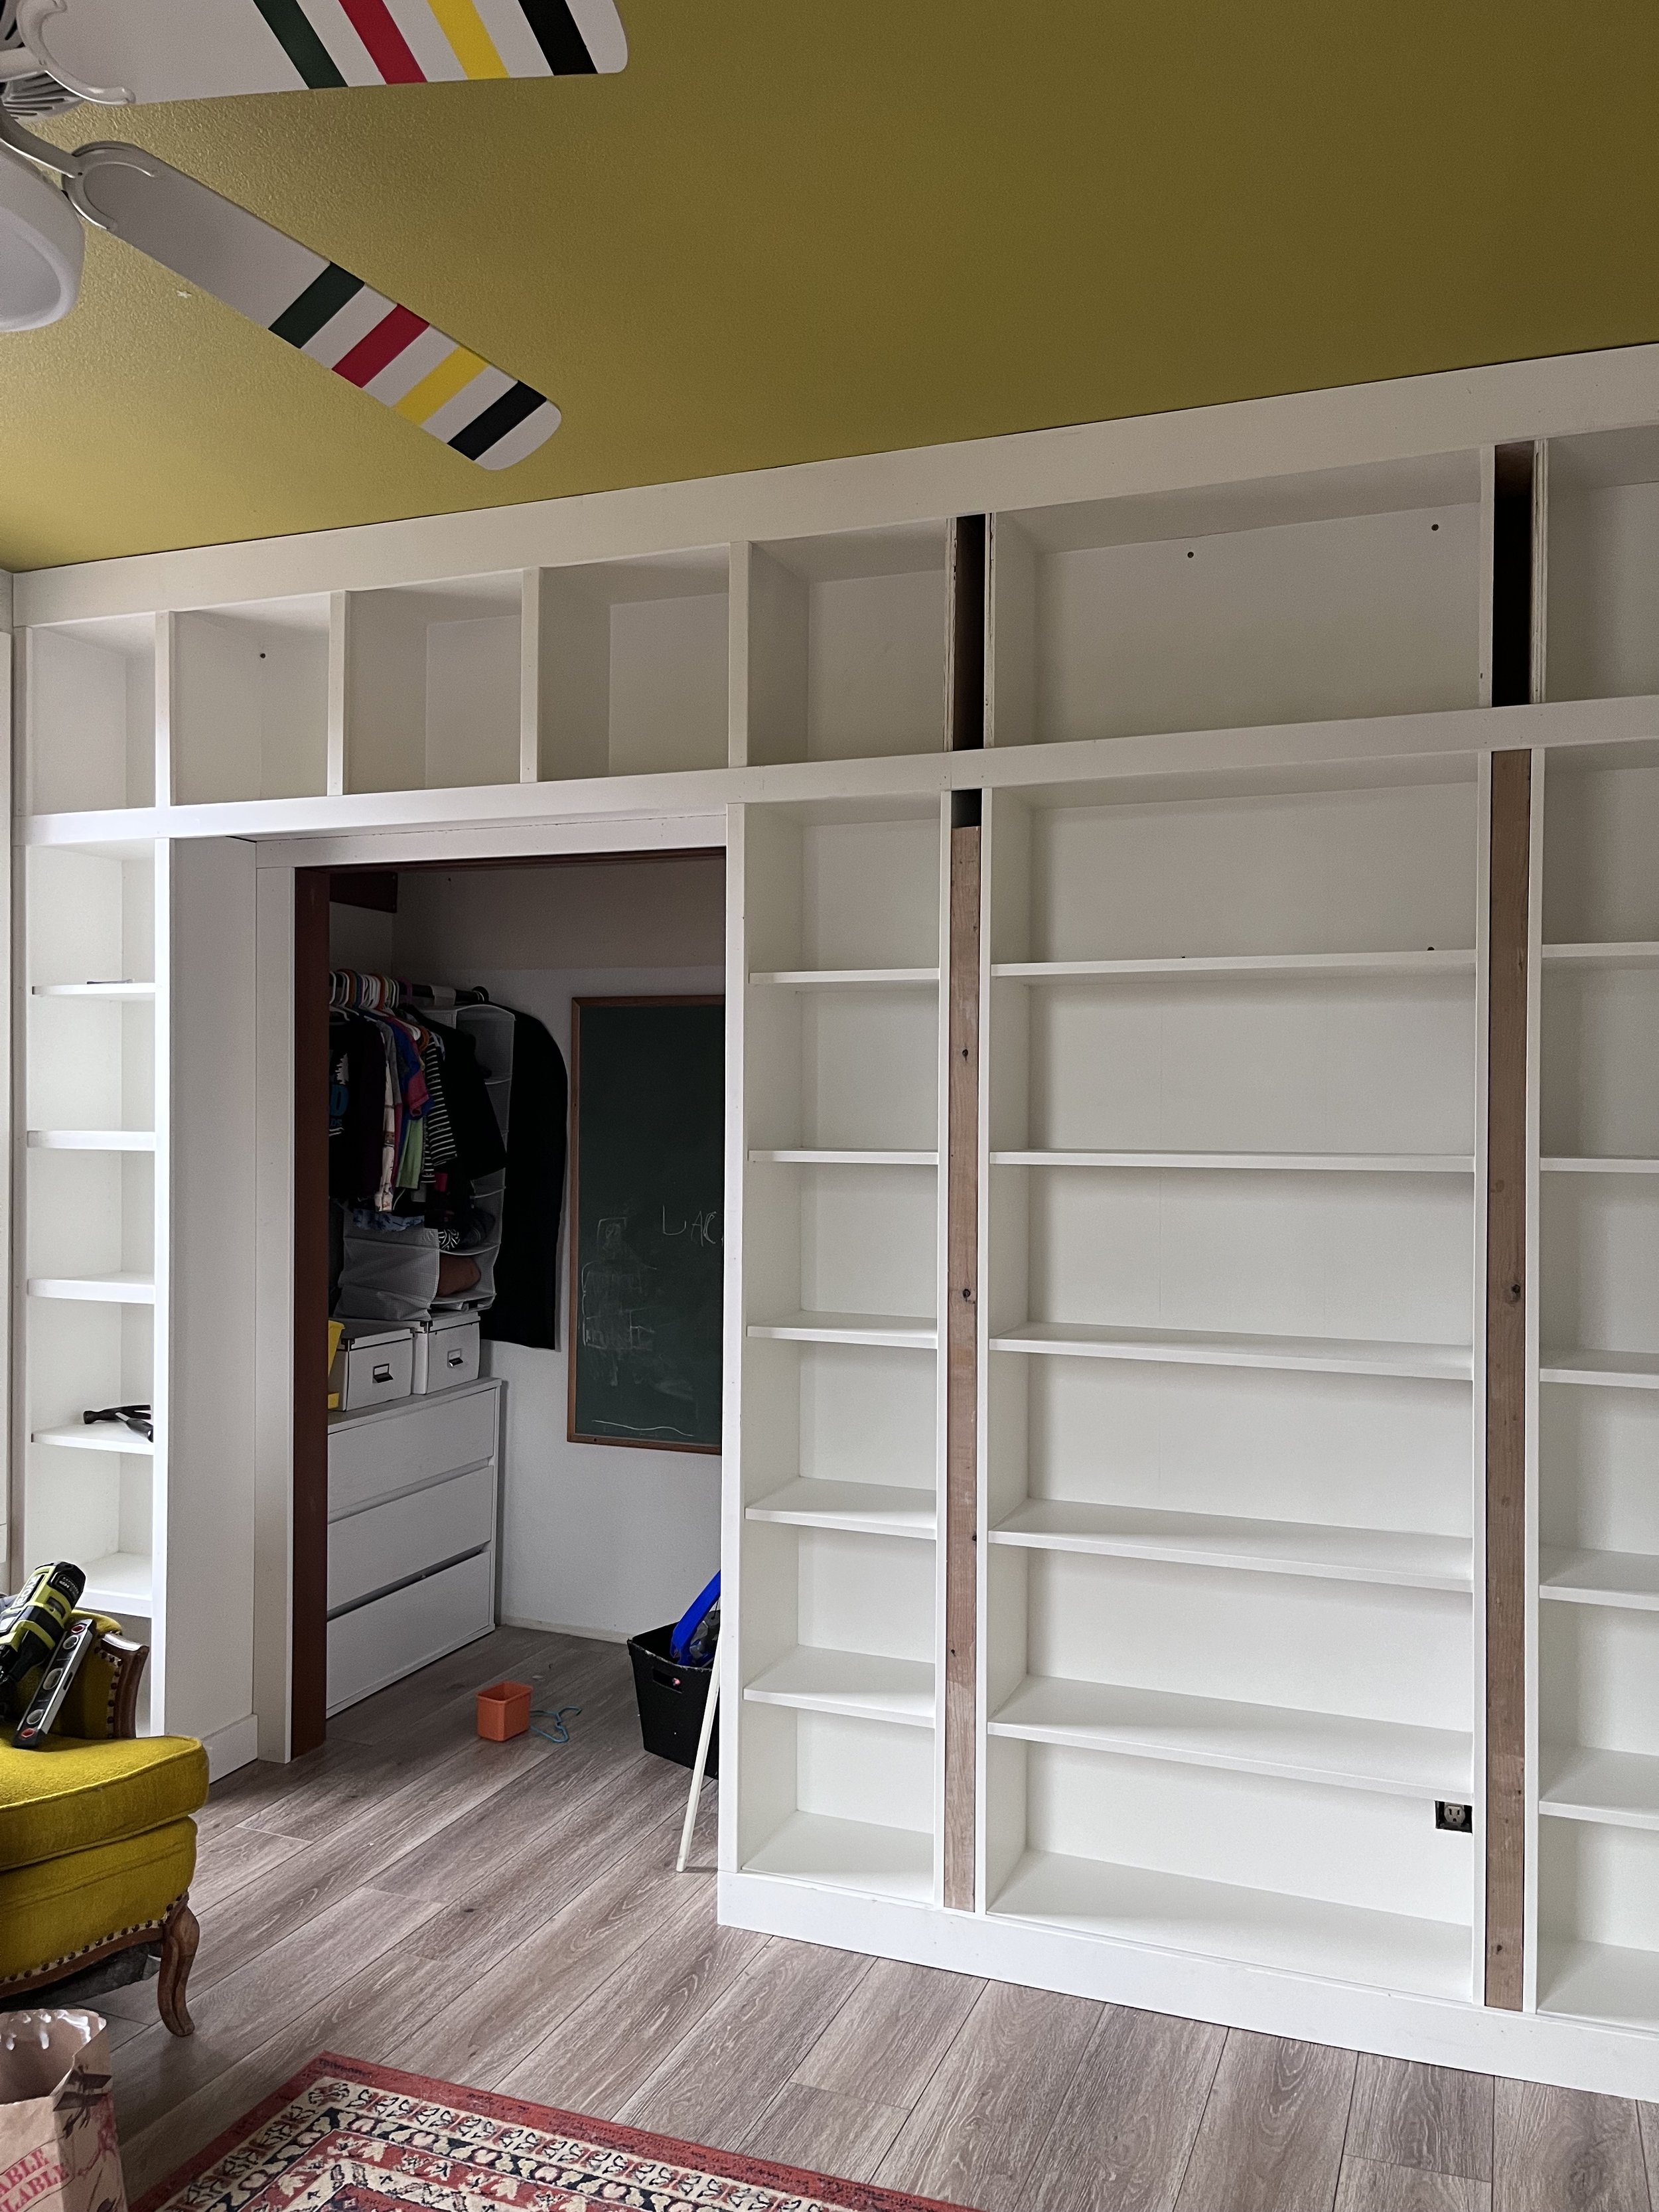
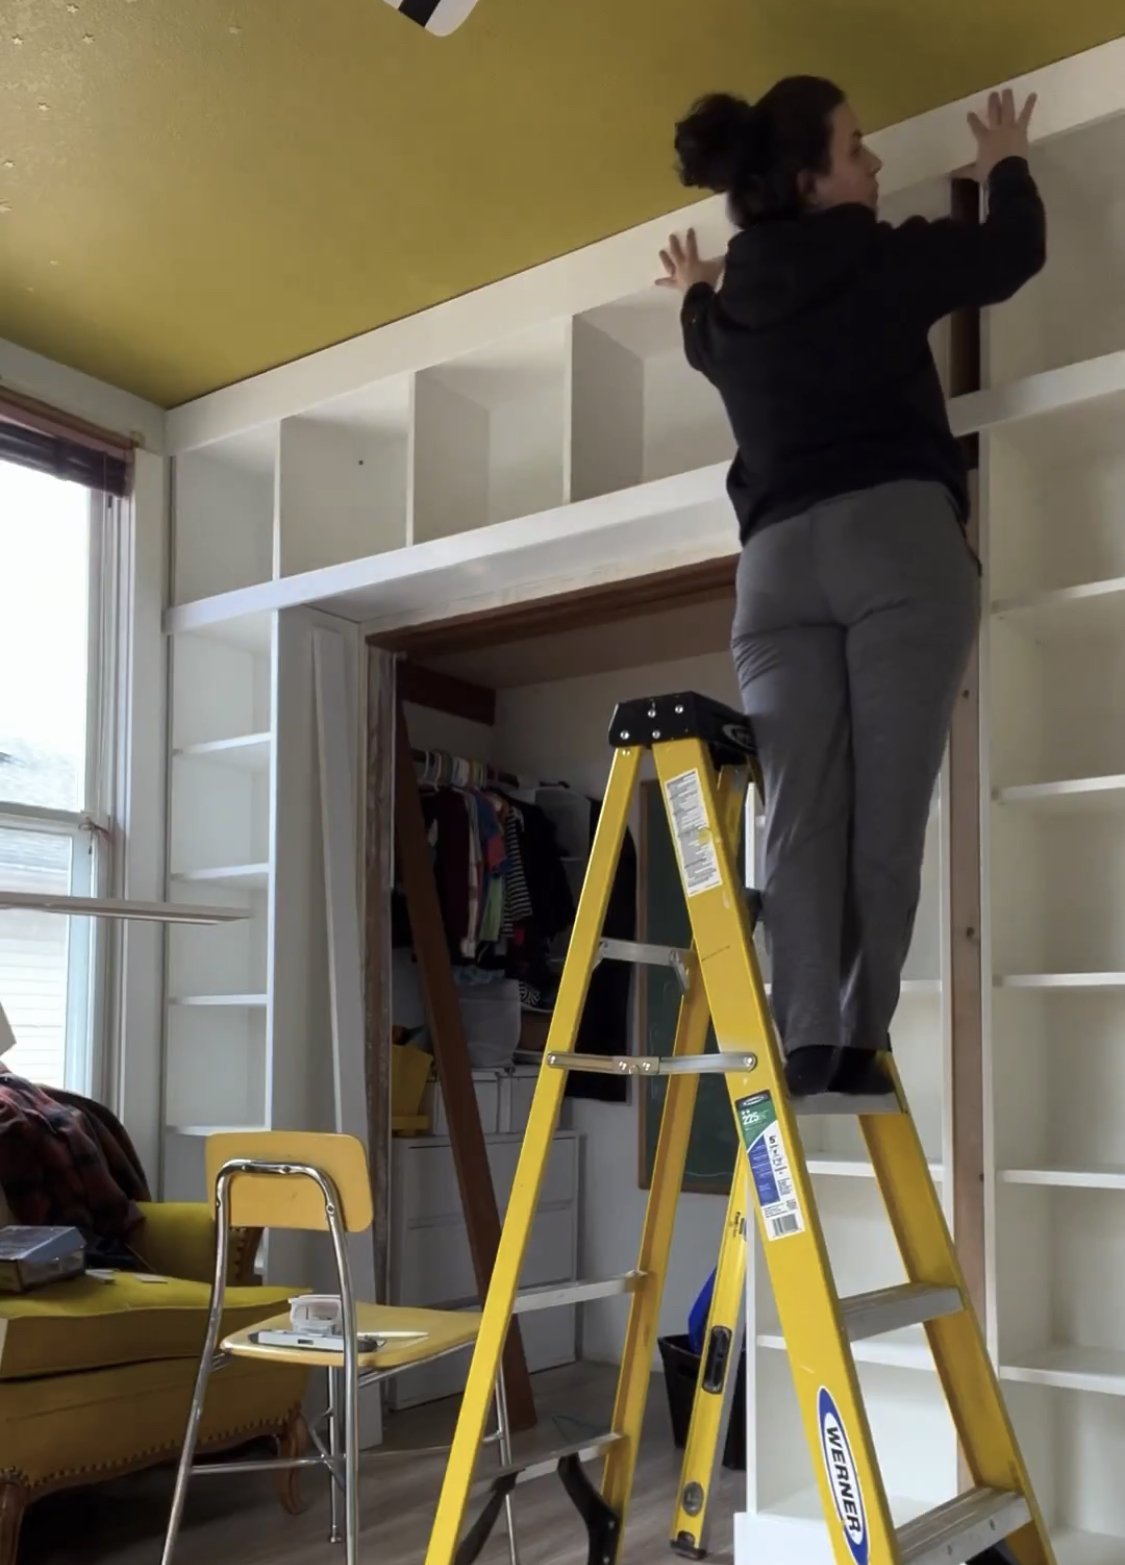
Ikea Hack Library Built-in
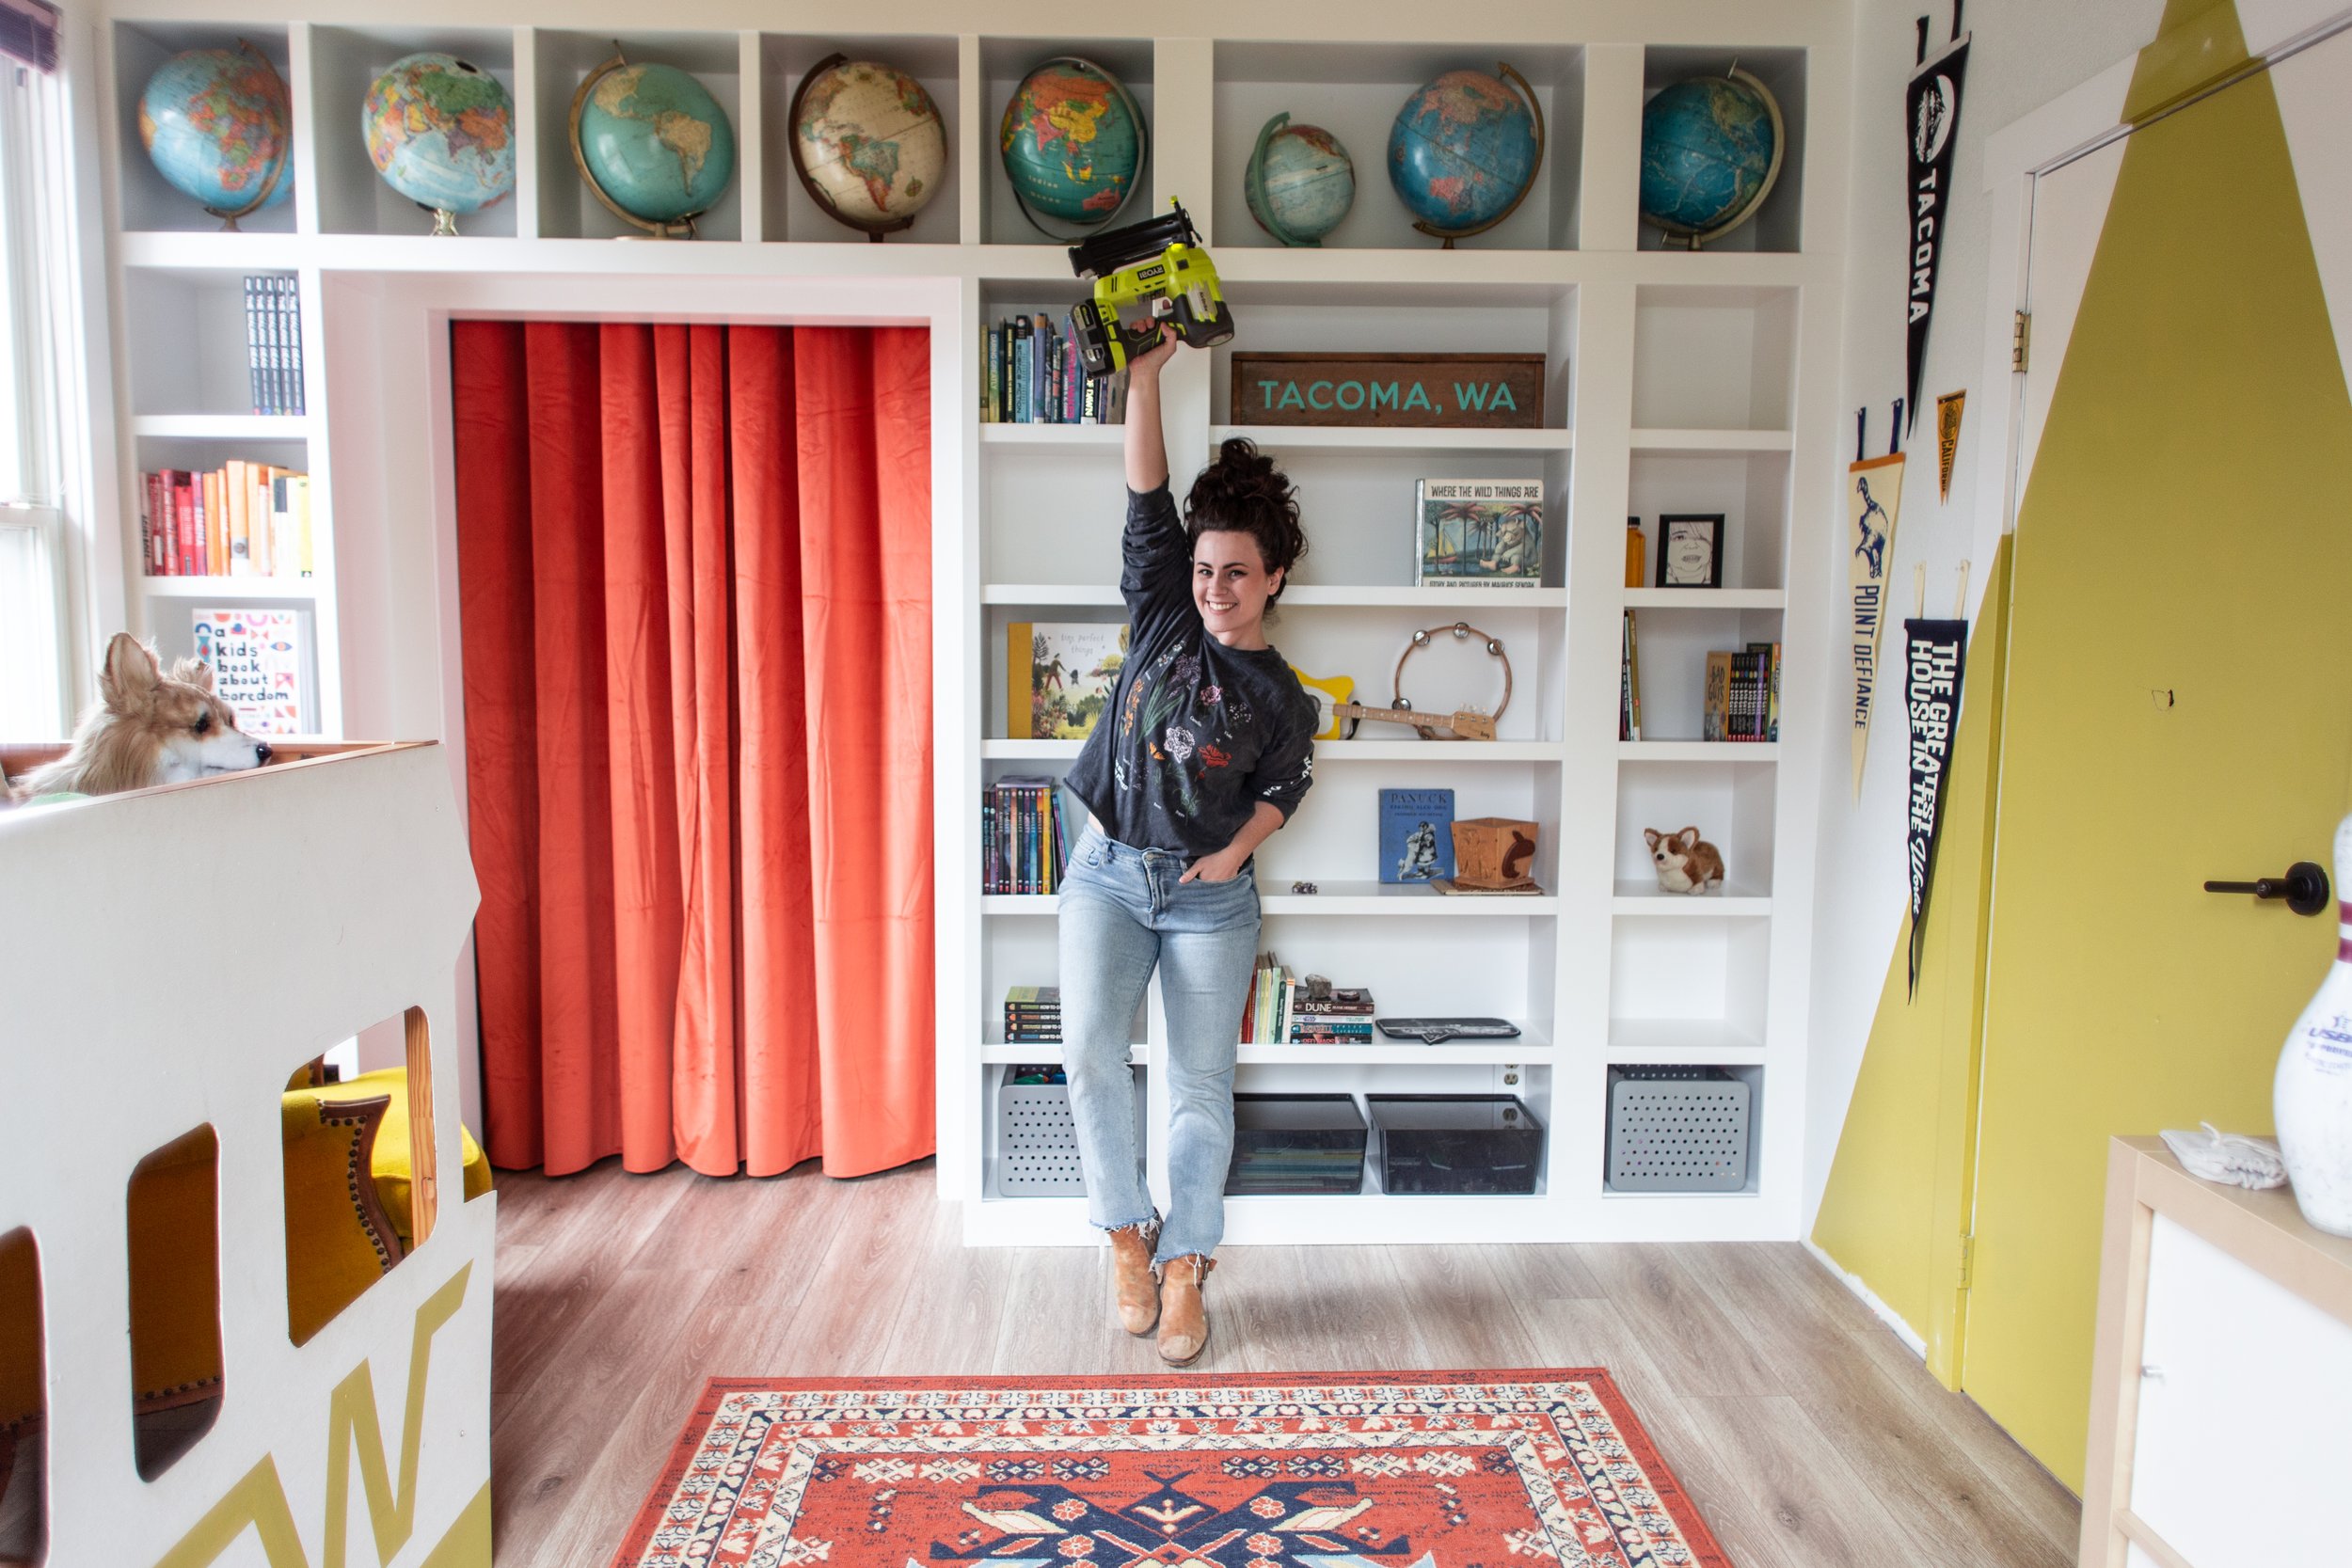
Jack’s library wall is done! This Ikea hack built-in bookshelf was such a fun project to tackle. This build was partially created from Ikea Billy bookcases. The top section of cubbies that spans the entire wall is custom built from scratch, and the shelves below that are the Billy bookcases. Everything was custom trimmed out and secured to the wall to be fully built-in and permanent!
This wall was originally space that was really unusable. You could put a dresser or bookshelves in the wider section of wall, but it’s also behind the swing of the door, so no seating or bed could be against that wall. I had an Ikea Kallax shelf there for a few years, holding Jack’s books, games, and toys, but as he’s started reading more and getting more into board games, I quickly ran out of space on that shelf. Transforming the wall into a floor-to-ceiling bookcase felt like the perfect way to add so much storage and functionality to this room.


Project Cost Breakdown
Plywood for top shelves: $119.50
Ikea Billy Bookcases (3x 16in wide and 1x 32in): $236.00
White Paint + Paint Brush: $64.98
Primer, Wood Filler, Caulk: $103.87
Trim (various sizes): $180.53
Coral Curtains (used an old existing Ikea curtain rod): $40.26
Project total: $745.14
This total doesn’t include the tools used to complete this project, which I already had. It also doesn’t include fasteners like screws or brad nails, which I also already had on hand. The tools I used to complete this project were:
Circular Saw
Drill + Impact Driver
Table Saw
Pocket Hole Jig
Brad Nailer
Corner Clamps
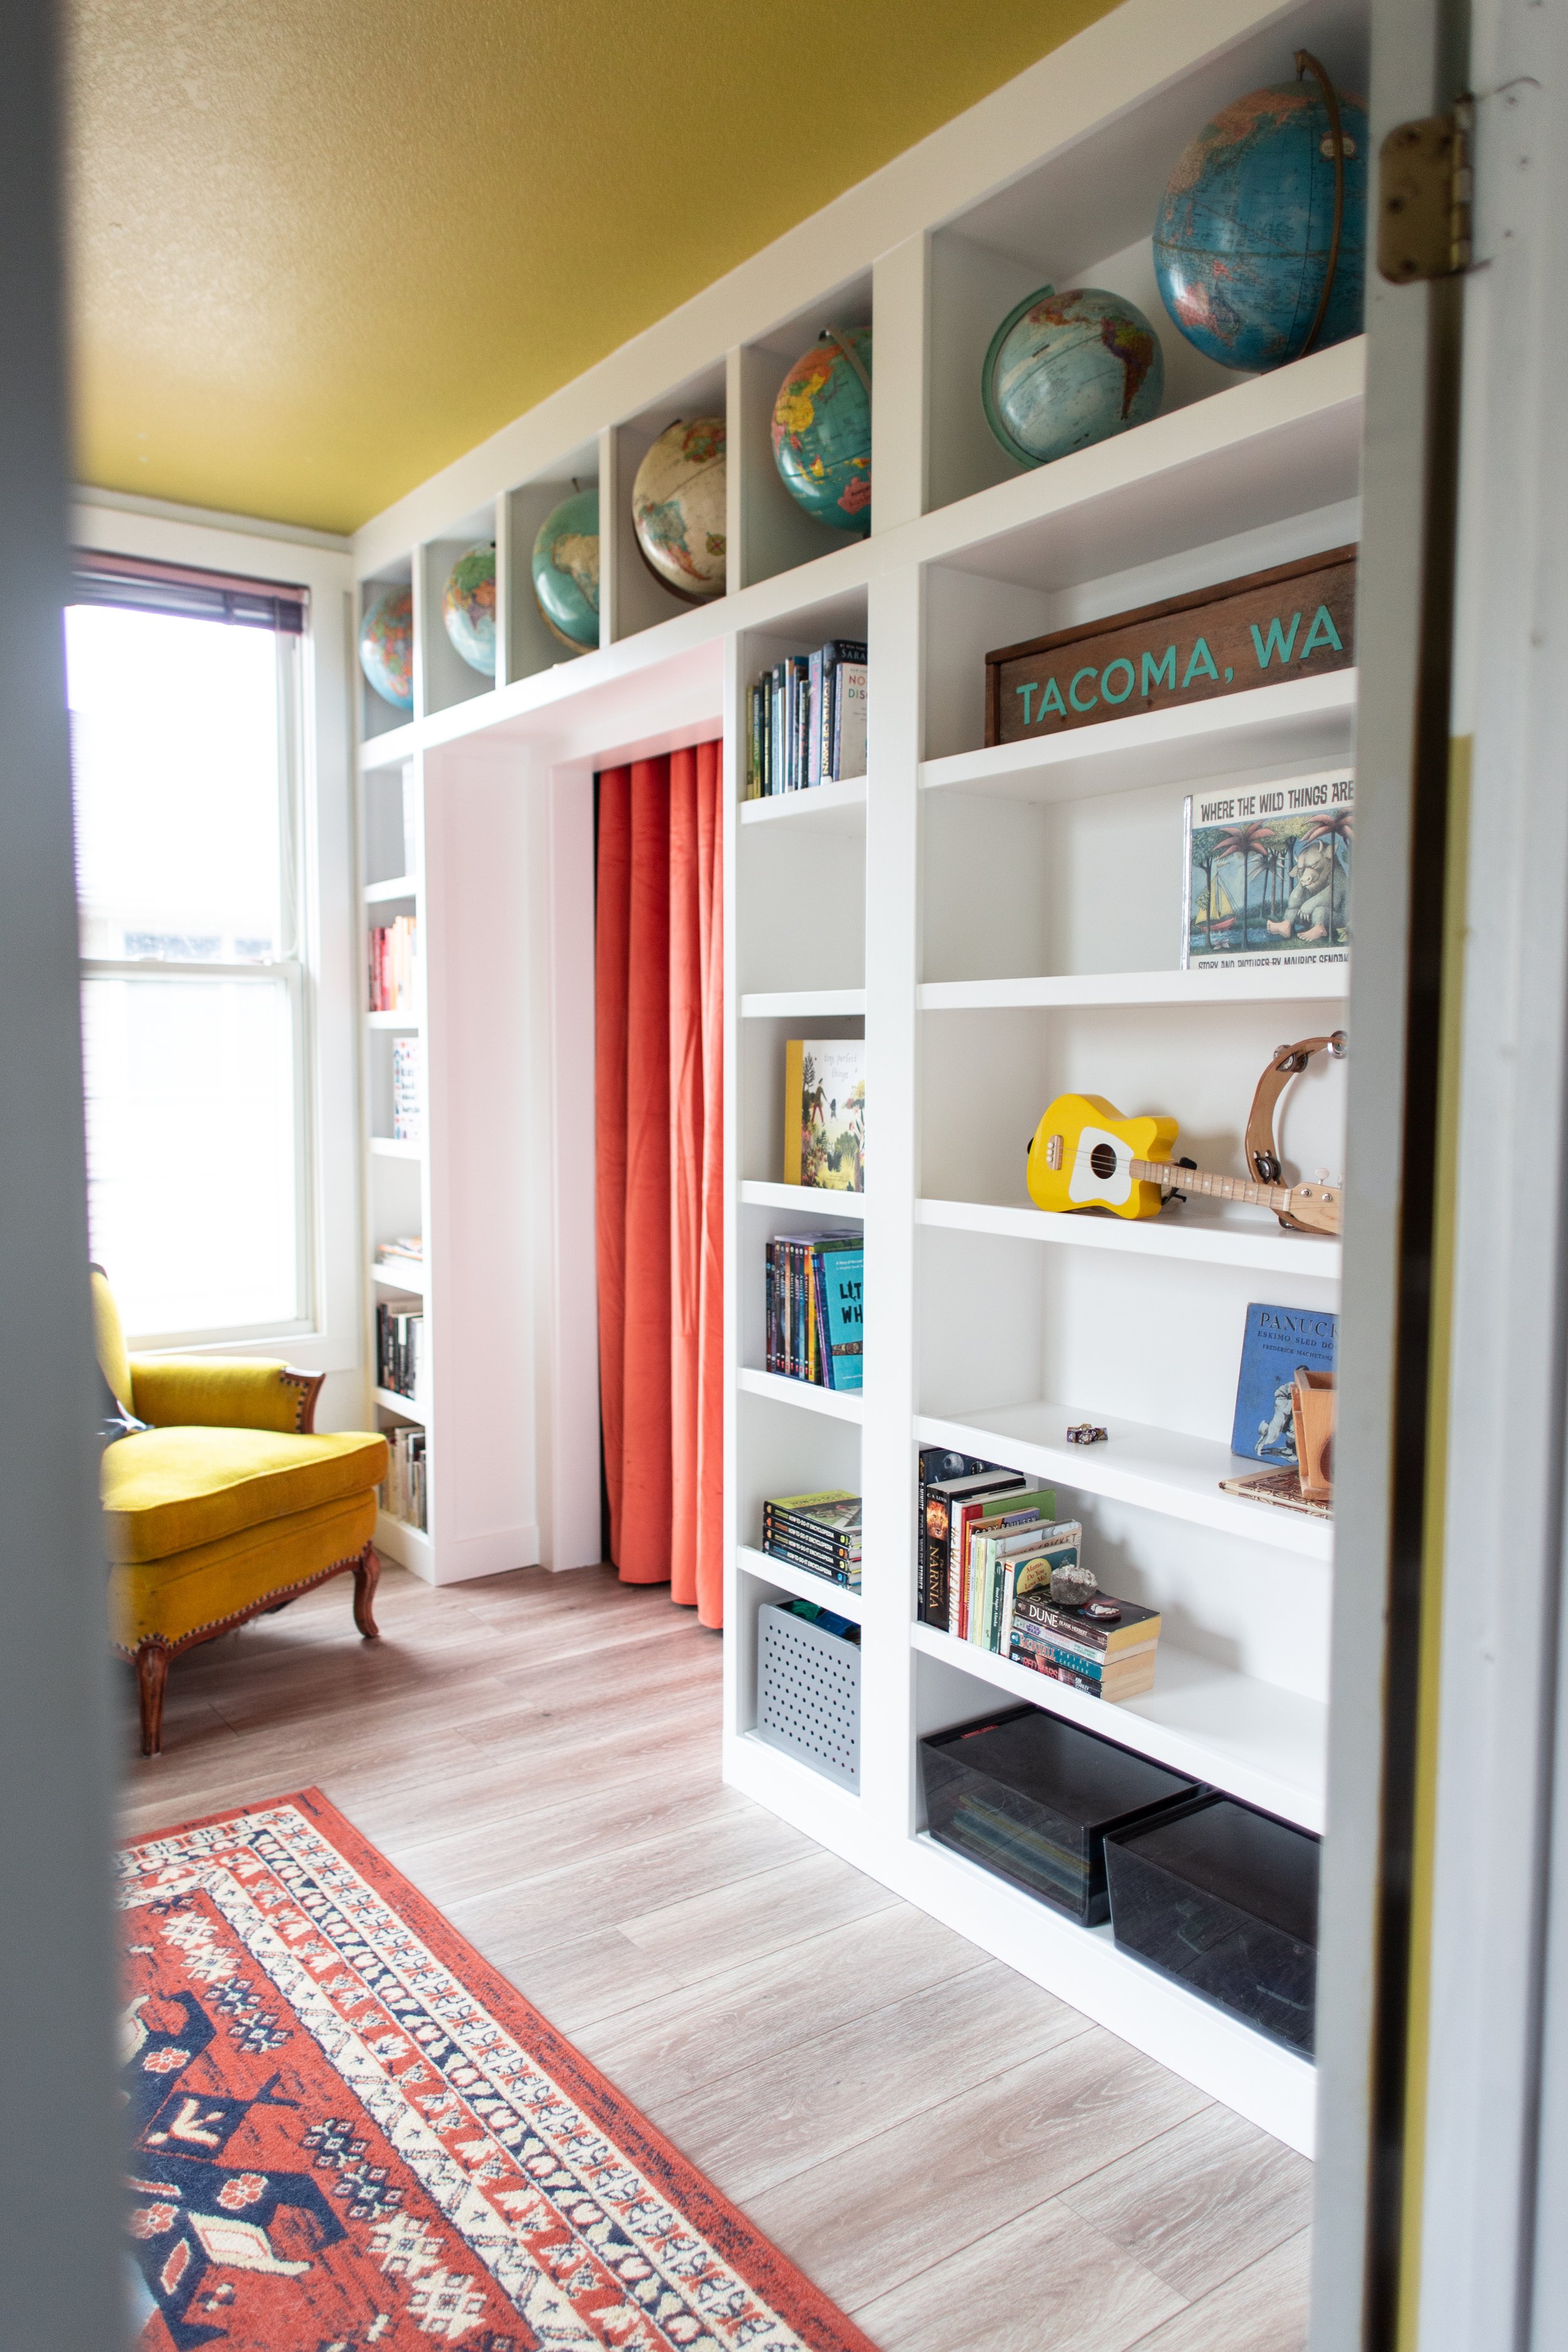

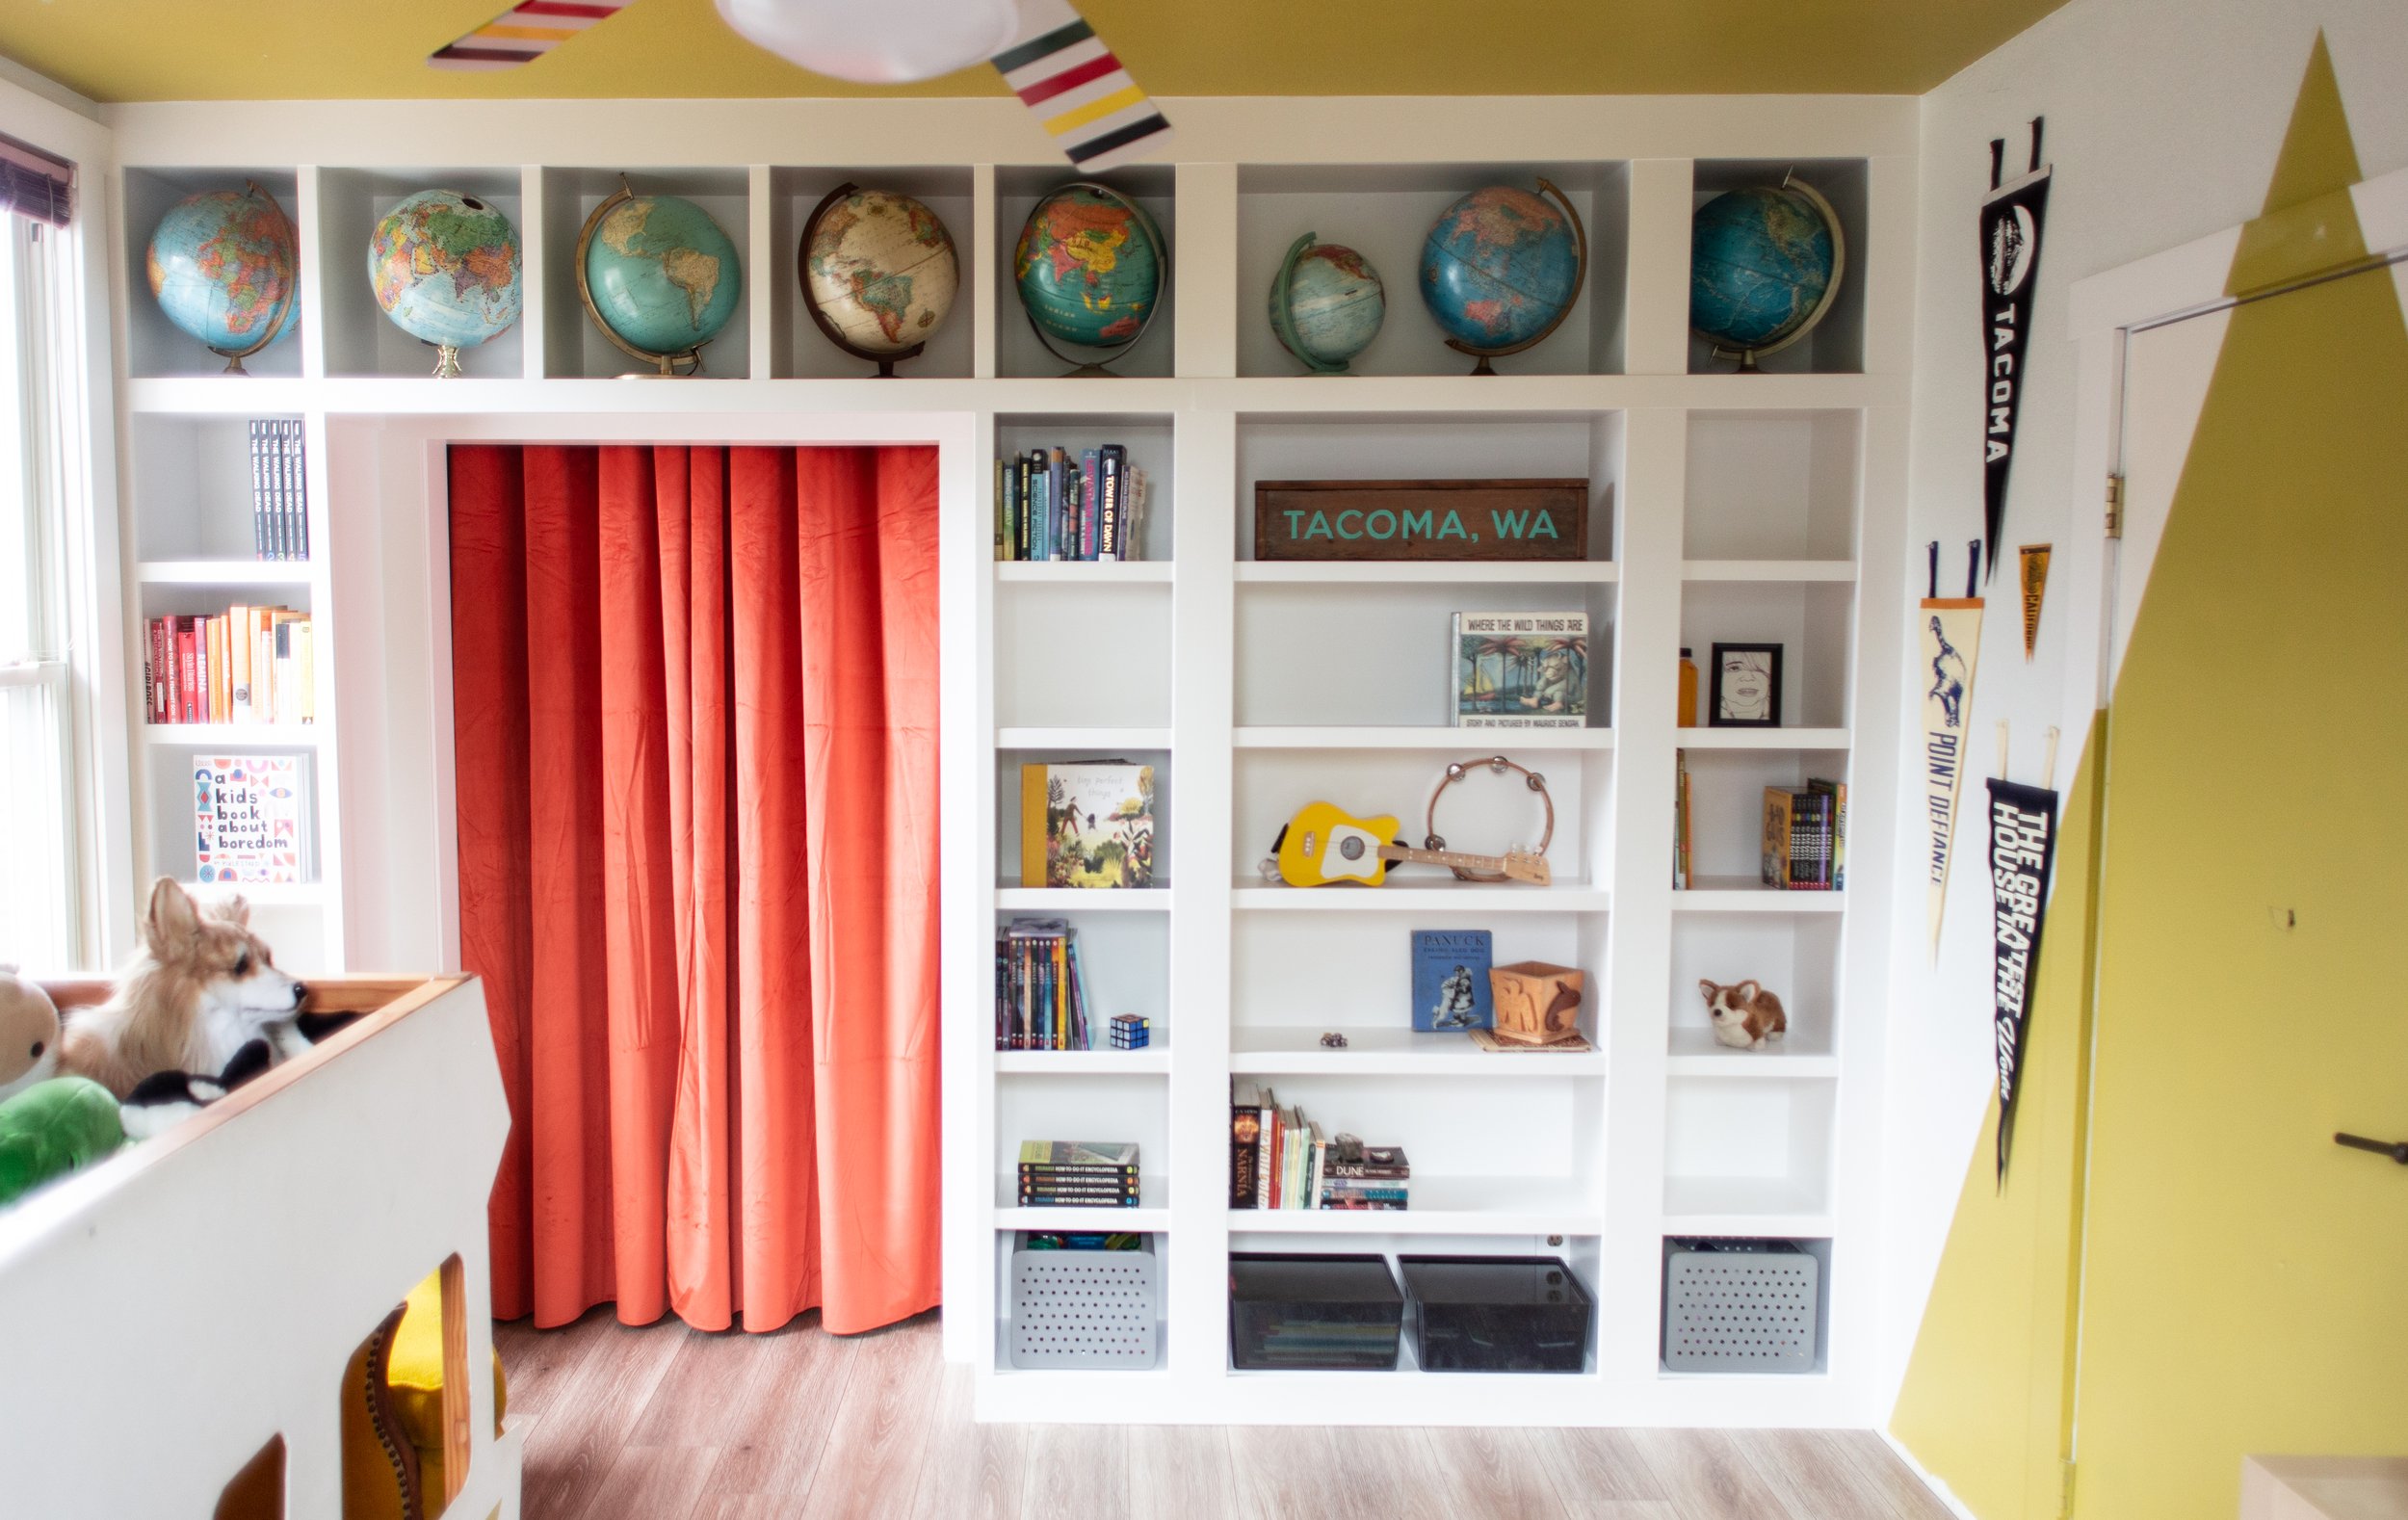

For this project, I decided to use Ikea Billy bookcases for the bottom section of shelves, then custom build the top section that spans the entire wall, going over the closet doorway.
I began by building the Ikea Billy bookcases. I needed to install all the shelves so I could fill all the bracket holes on the insides with wood filler. This really makes them feel seamless and built-in without all the little holes. Once the wood filler was dry I could take these outside and sand them to smooth out the wood filler and scuff up the laminate finish to prep for primer. I sanded with 220 using my sheet sander, then pulled them into the garage to spray with primer.
Using my Graco X7 paint sprayer I sprayed Zinsser B-I-N primer, which is a shellac based primer that sticks super well to finishes like the laminate Ikea furniture finish. Make sure to wear a respirator mask when spraying it, this stuff is pretty nasty but it works great. I put two coats of primer on.
To install the Ikea bookcases, I needed to measure where my studs were and then I added 1/2in scraps of plywood to the wall where the studs were because the way the back of these bookshelves is constructed leaves about a 1/2in gap between the back panel and the wall, which you can see in the video below
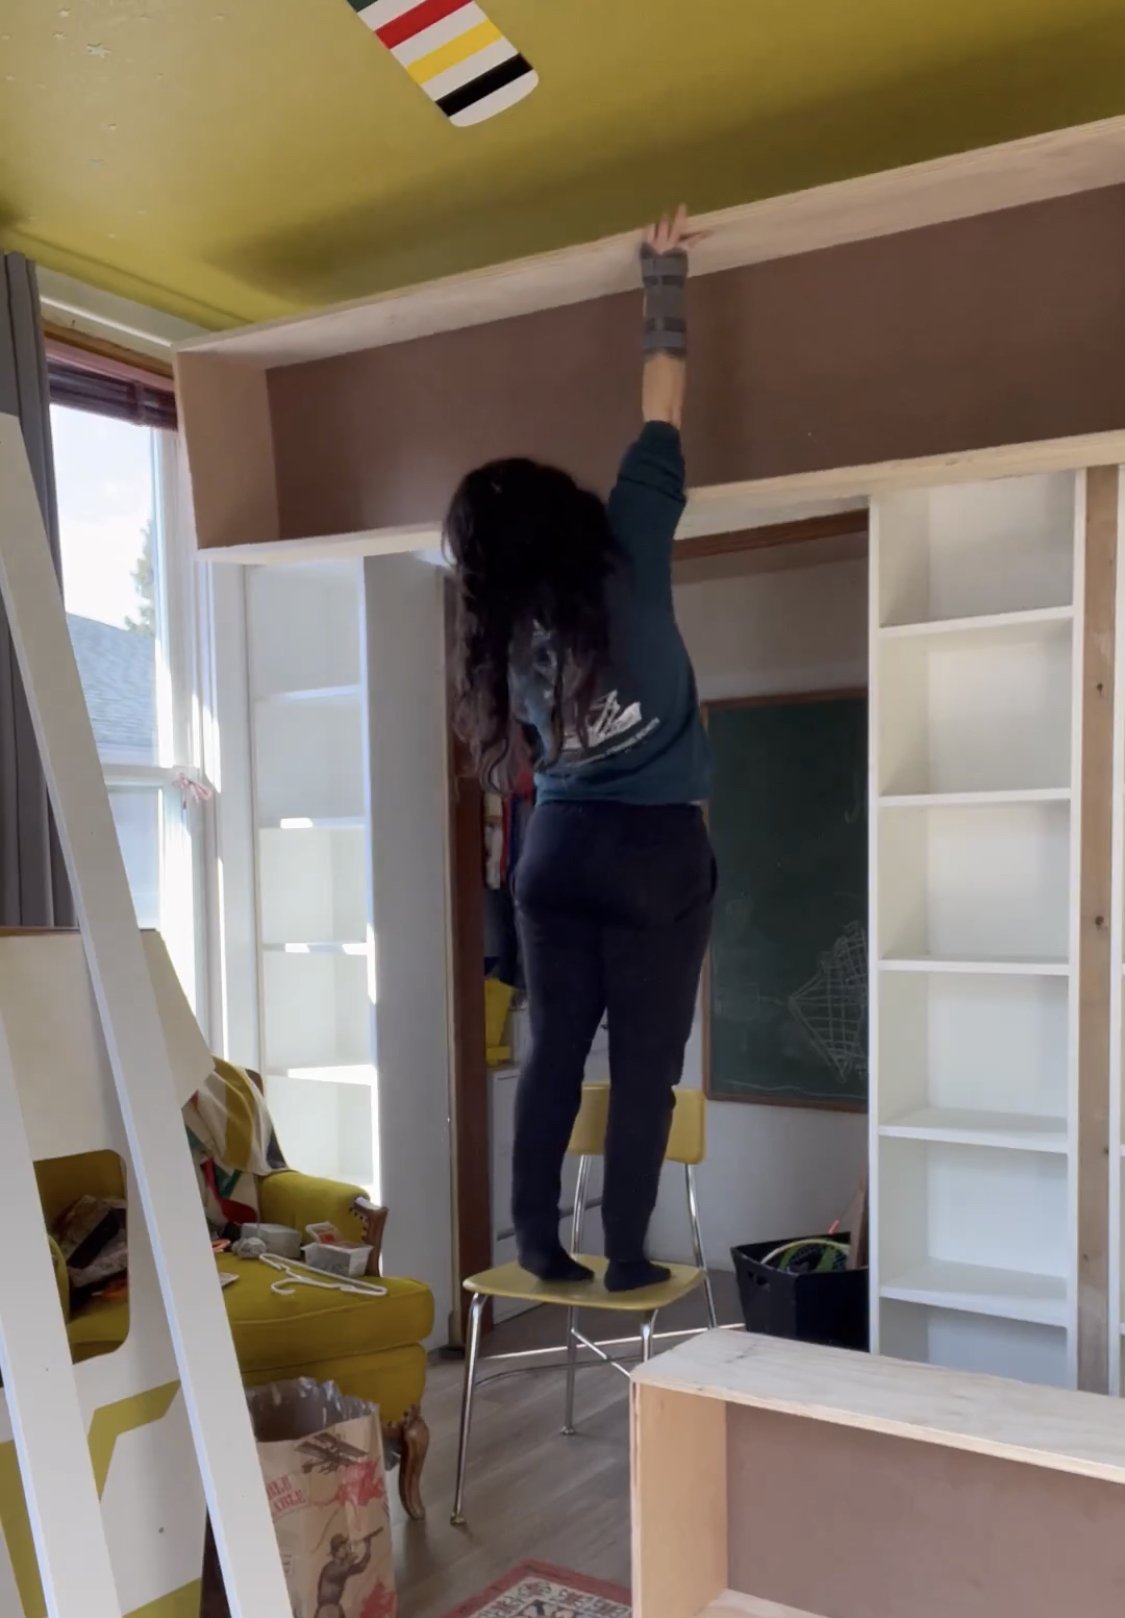
I screwed through the back of the bookshelves, the plywood scrap and into the studs to secure these to the wall, then I got to work building the top section of the library from scratch.
I built this section in two pieces, one piece that spanned over the closet doorway and sat atop the two 16” billy bookcases that flank that doorway, and then a second one that sat atop the 32” bookcase and the 16” bookcase in the corner of the room. I used cabinet grade plywood to build these, which was about $55/sheet at Home Depot, and then used hardboard for the back wall.
I mapped out the measurements for all the side panels and inside vertical separators and input those into cutlistoptimizer.com to get an efficient plan for how to utilize my plywood to avoid waste, this was super helpful when it came time to cut every piece.

To assemble these upper boxes, I used my Kreg pocket hole jig and drilled two pocket holes on the top and bottom of the vertical sides of the box, and then used corner clamps to hold everything together nice and square while I screwed the sides on to the bottom of the box. Then I flipped it over to attach the top, again using pocket screws.
To cut the hardboard for the back, I just laid the boxes on the hardboard, traced around their perimeter, and then cut out those rectangles. Those got nailed on to the back of the boxes, then we pulled the boxes inside to temporarily install them on the top of the billy bookcases so I could mark where all the vertical dividers would go in those boxes. I wanted all the dividers to match up perfectly with the sides of the Ikea shelves so things looked seamless from bottom to top.
With those measurements taken, I then brought those boxes back down to the ground and installed the verticals using wood glue and brad nails. The final thing the custom boxes needed was a couple coats of primer, so they went back out to the garage for spraying.
Finally they could be installed permanently, again— screwing them to the studs (these didn’t need that extra plywood because they didn’t have a gap between the back panel and the wall).
Now I’m able to start installing trim and this is where things get really fun because it starts to feel really built in and finished. I had a couple wider vertical sections, and then a wider crown piece and a 2in horizontal that spanned the full wall, but for the most part the fronts of the bookshelf all got 1.5in wide trim: verticals as well as the horizontal shelf fronts. I used by brad nailer to install all of these, making sure to nail in at opposing diagonals for added security.
All the nail holes got filled with wood filler, and all the seams and joints got caulk, then it was time for paint!
I used Behr’s Scuff Defense paint in Satin finish with the color Bit of Sugar, which is a really nice bright white. Two coats later and I was done! I chose to brush and roll the paint on, rather than have to mask off the whole room and drag my big ol paint sprayer into the house. It took a little longer, but I’m happy with how smooth the finish ended up.
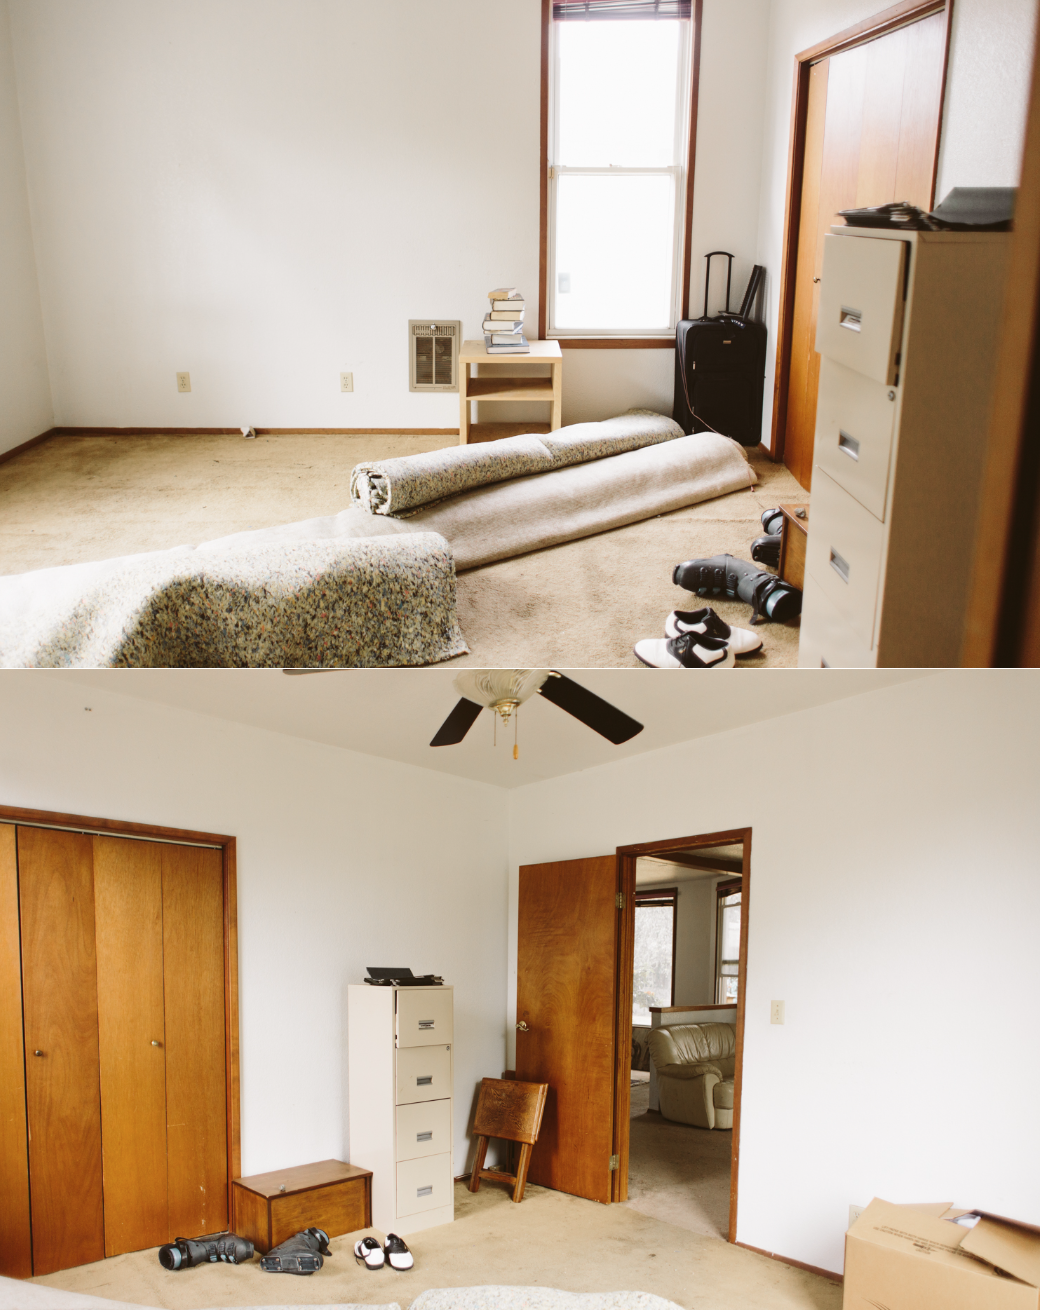
Can you believe this is the same room, just a few short years ago? (Okay maybe not short years. We did have a whole pandemic between 2018 and now— it’s actually felt like an eternity since we bought this house).
I’m super proud of how this room has transformed and TBH I think Jack’s room might be my favorite room in the entire house. It’s so bright and happy and fun. It feels really special.
You may also like:


Hi, I’m Liz
I'm an artist, writer, designer, DIY renovator, and … well basically I like to do all the things. If it’s creative I’m probably doing it. I’ve spent over 30 years voraciously pursuing a life steeped in creativity and I wholeheartedly believe creativity and joy are inextricably linked.
Read more…


Explore The Archive
- July 2025
- May 2025
- January 2025
- December 2024
- August 2024
- July 2024
- May 2024
- April 2024
- January 2024
- December 2023
- October 2023
- September 2023
- July 2023
- June 2023
- May 2023
- April 2023
- March 2023
- February 2023
- January 2023
- December 2022
- November 2022
- October 2022
- August 2022
- June 2022
- May 2022
- April 2022
- March 2022
- November 2021
- October 2021
- August 2021
- July 2021
- May 2021
- January 2021
- November 2020
- October 2020
- September 2020
- August 2020
- July 2020
- June 2020
- May 2020
- April 2020
- February 2020
- January 2020
- November 2019
- October 2019
- August 2019
- July 2019
- June 2019
- May 2019
- April 2019
- February 2019
- January 2019
- December 2018
- November 2018
- October 2018
- September 2018
- August 2018
- July 2018
- June 2018
- May 2018
- April 2018
- February 2018
- January 2018
- November 2017
- September 2017
- August 2017
- July 2017
- June 2017
- May 2017
- April 2017
- March 2017
- February 2017
- January 2017
- December 2016
- November 2016
- October 2016
- September 2016
- August 2016
- June 2016
- May 2016
- April 2016
- March 2016
- February 2016
- January 2016
- December 2015
- November 2015
- October 2015
- September 2015
- August 2015
- July 2015
- June 2015
- May 2015
- April 2015
- March 2015
- February 2015
- January 2015
- December 2014
- November 2014
- October 2014
- September 2014
- August 2014
- July 2014
- June 2014
- May 2014
- April 2014
- March 2014
- February 2014
- January 2014
- December 2013
- November 2013
- October 2013
- September 2013
- August 2013
- July 2013
- June 2013
- May 2013
- April 2013
- March 2013
- February 2013
- January 2013
- December 2012
- November 2012
- October 2012
- September 2012
- August 2012
- July 2012
- June 2012
- May 2012
- April 2012
- March 2012
- February 2012
- January 2012
- December 2011
- November 2011
- October 2011
- September 2011
- August 2011
- July 2011
- June 2011
- May 2011
- April 2011
- March 2011
- February 2011
- January 2011
- December 2010
- November 2010
- October 2010
- September 2010
- August 2010
- July 2010
- June 2010
- May 2010
- April 2010
- March 2010
- February 2010
- January 2010
- December 2009
- November 2009
- October 2009
- September 2009
- August 2009
- July 2009
- June 2009
- May 2009
- April 2009
- March 2009
- February 2009
- January 2009
- December 2008
- November 2008
- October 2008
- September 2008
- August 2008
- July 2008

VISIT THE SHOP


PRIVACY POLICY & DISCLOSURE
We are a participant in the Amazon Services LLC Associates Program, an affiliate advertising program designed to provide a means for us to earn fees by linking to Amazon.com and affiliated sites.