
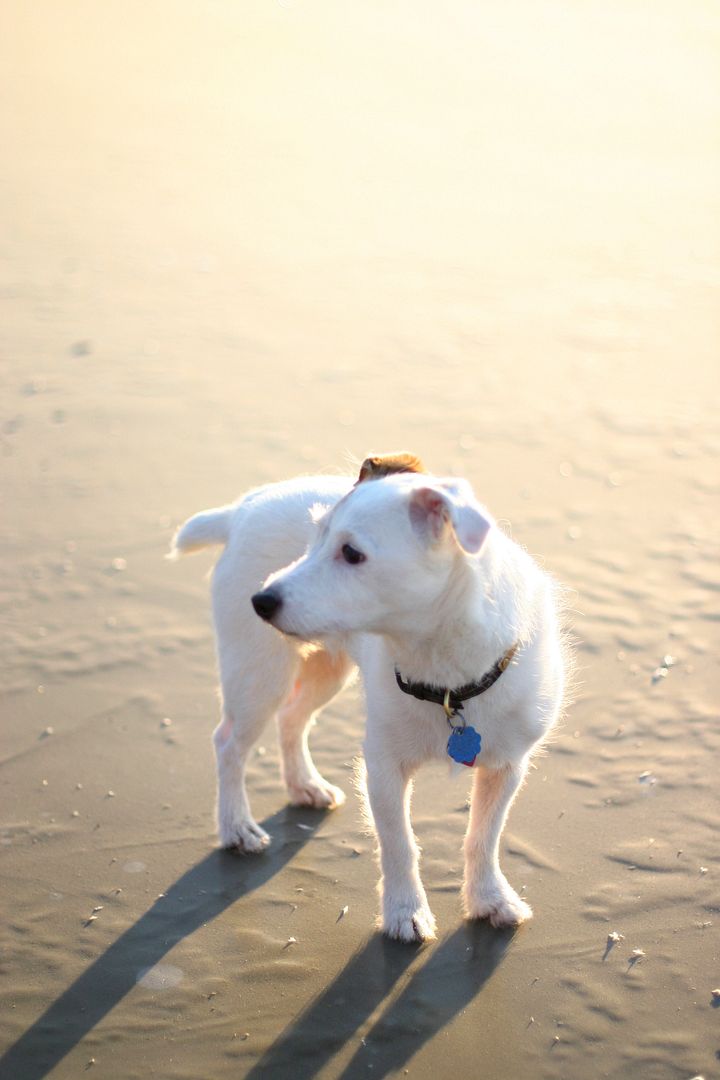
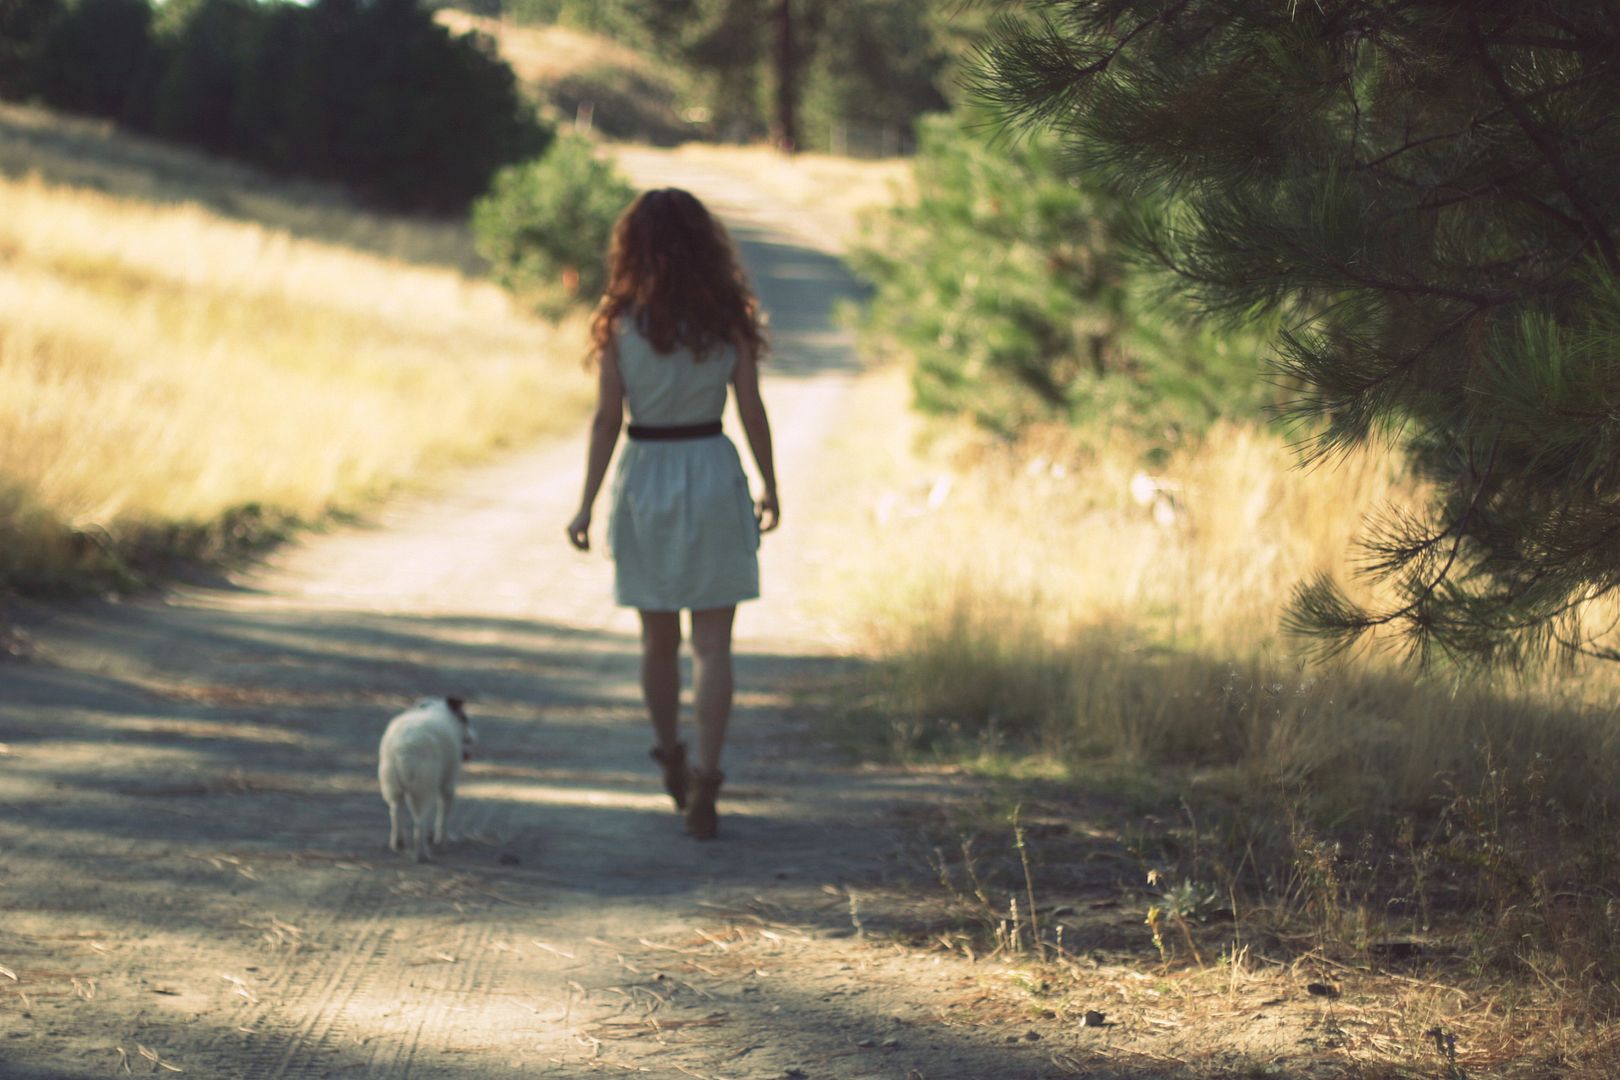
goodbye little friend
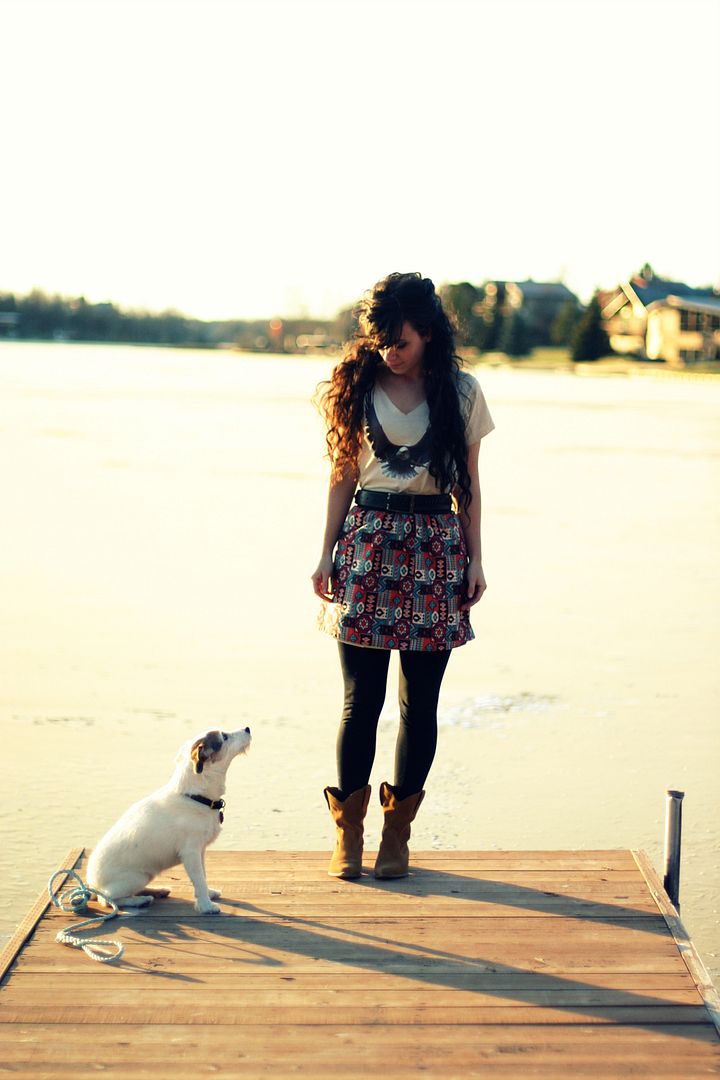
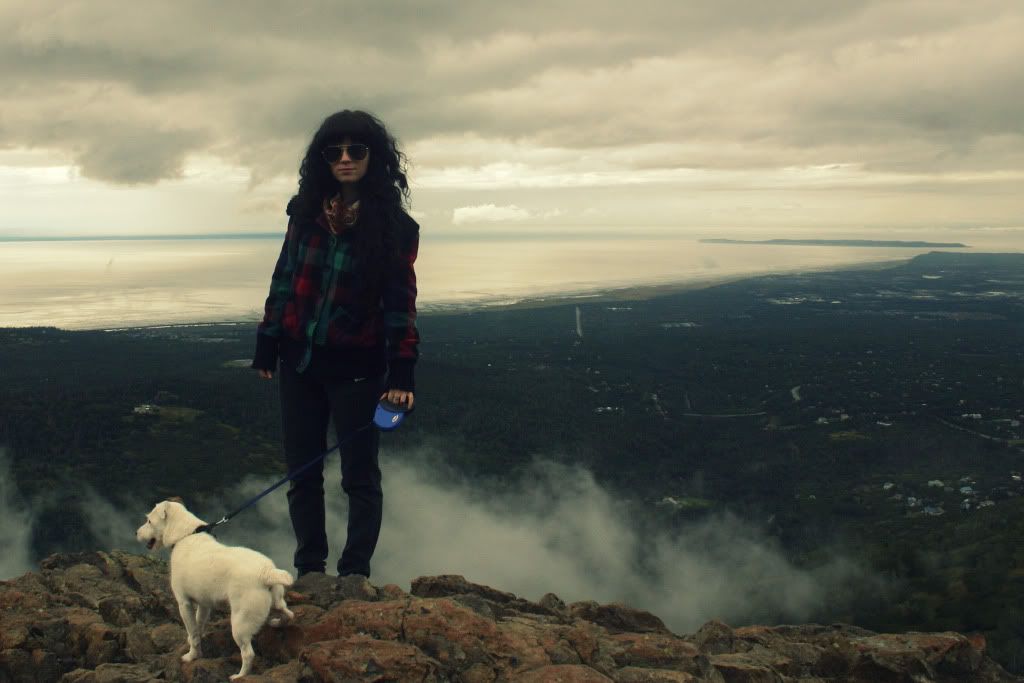
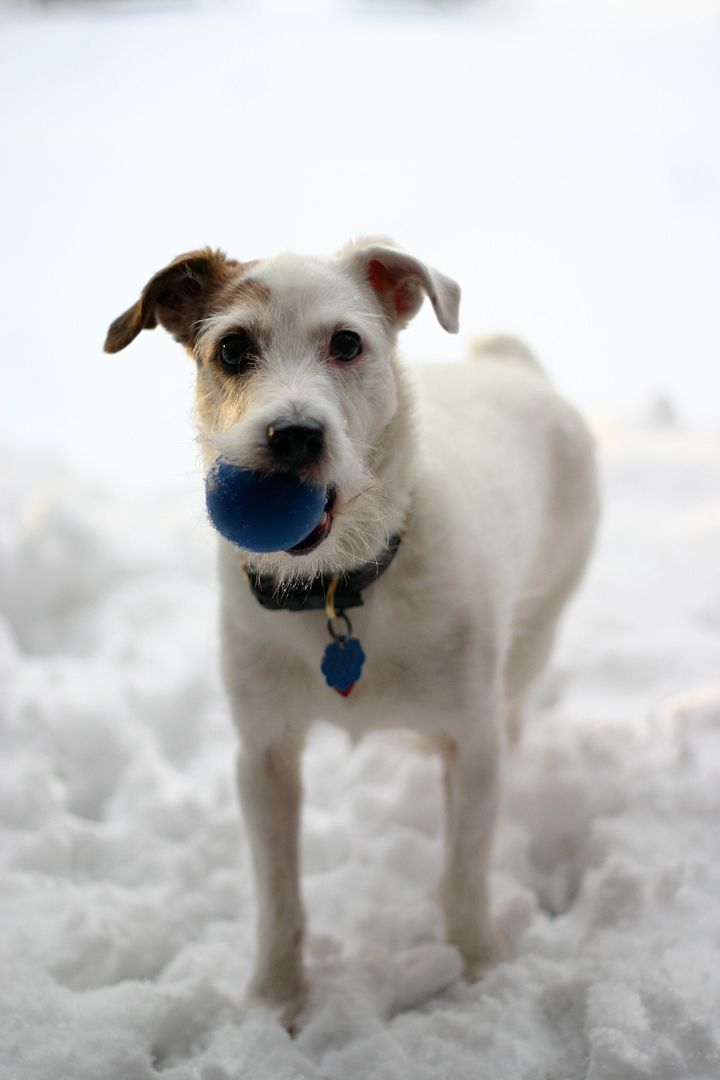
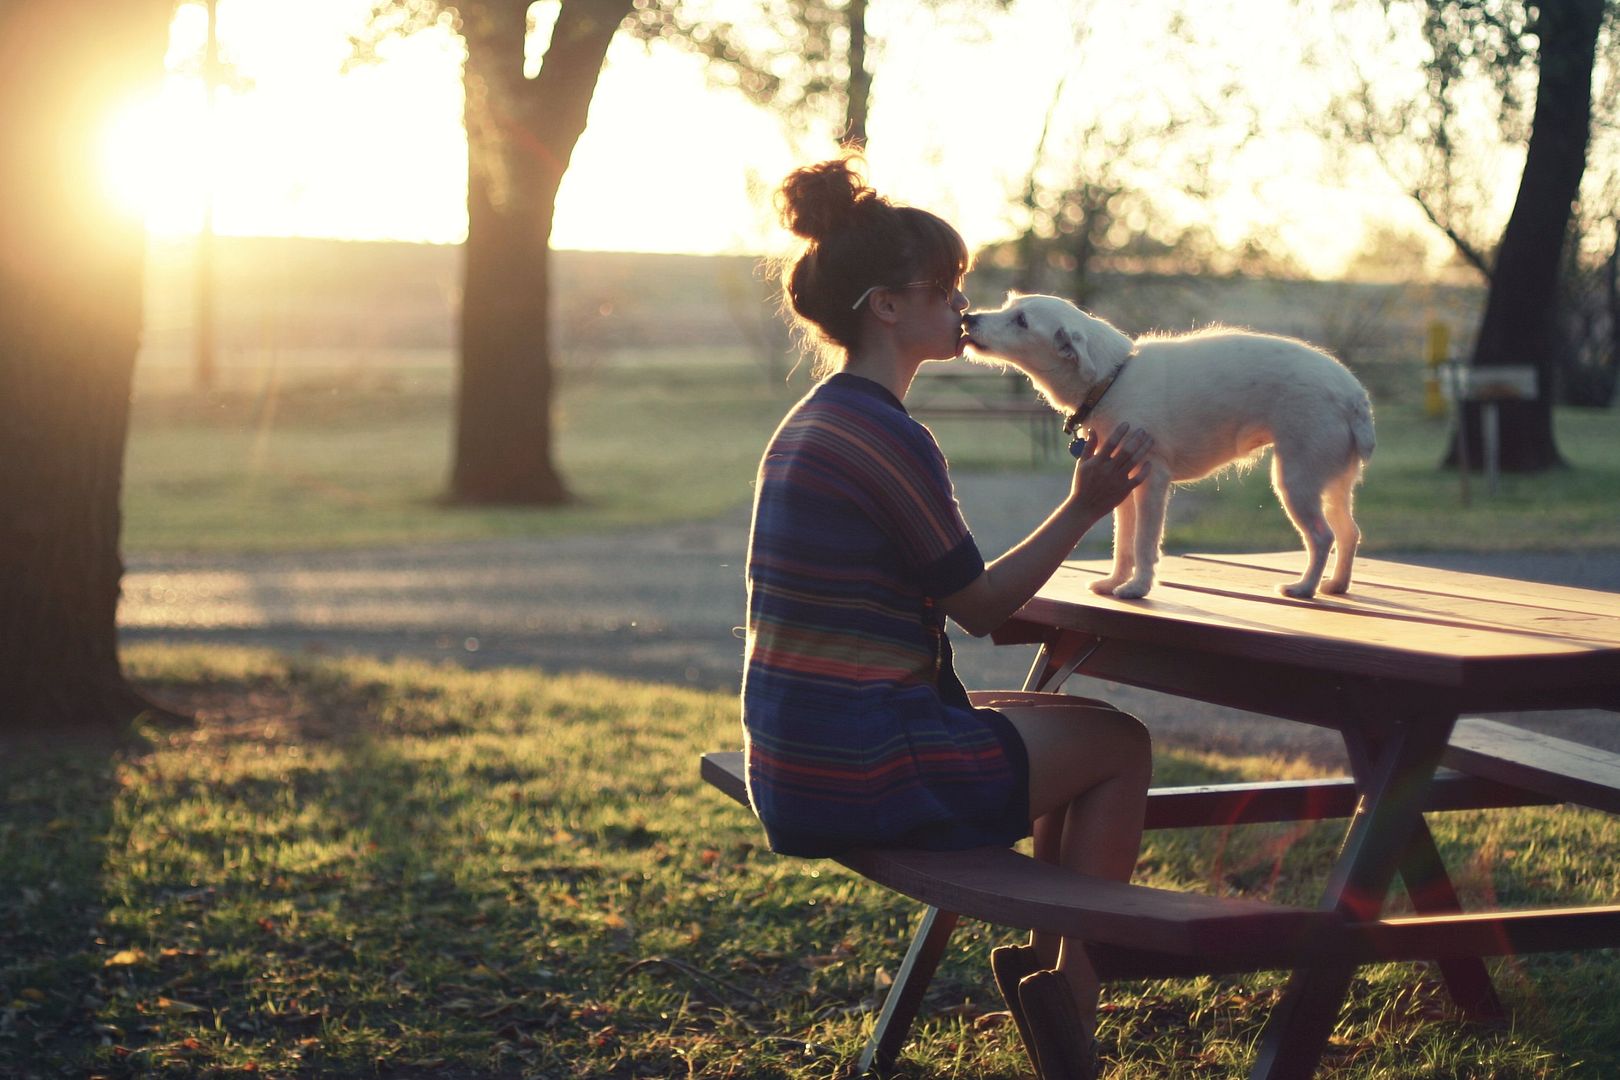
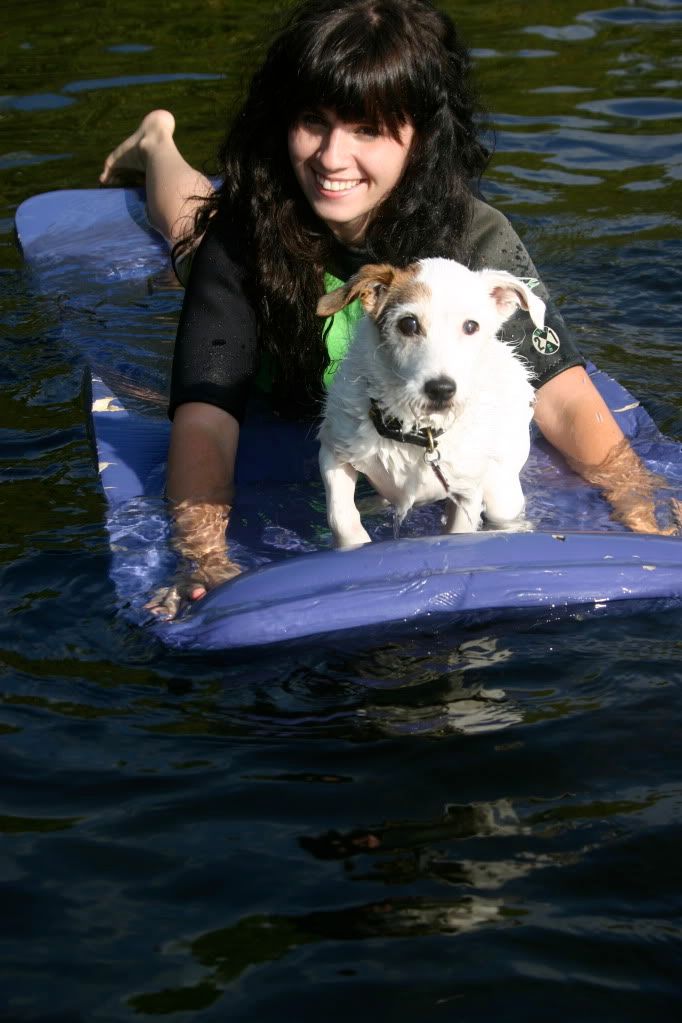
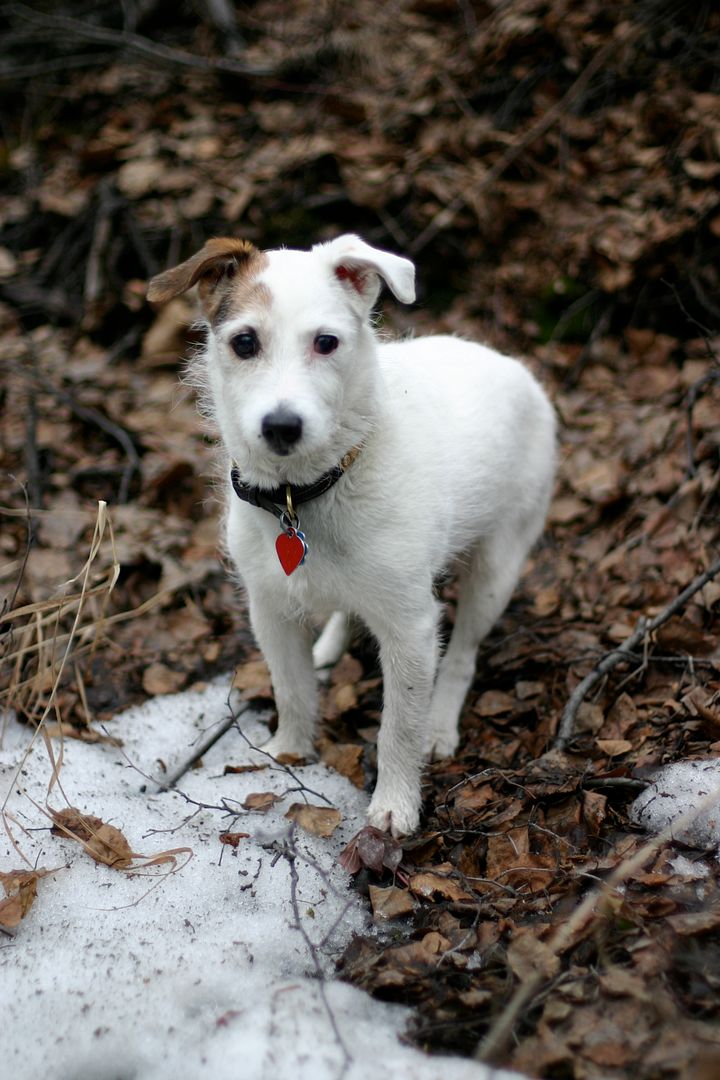
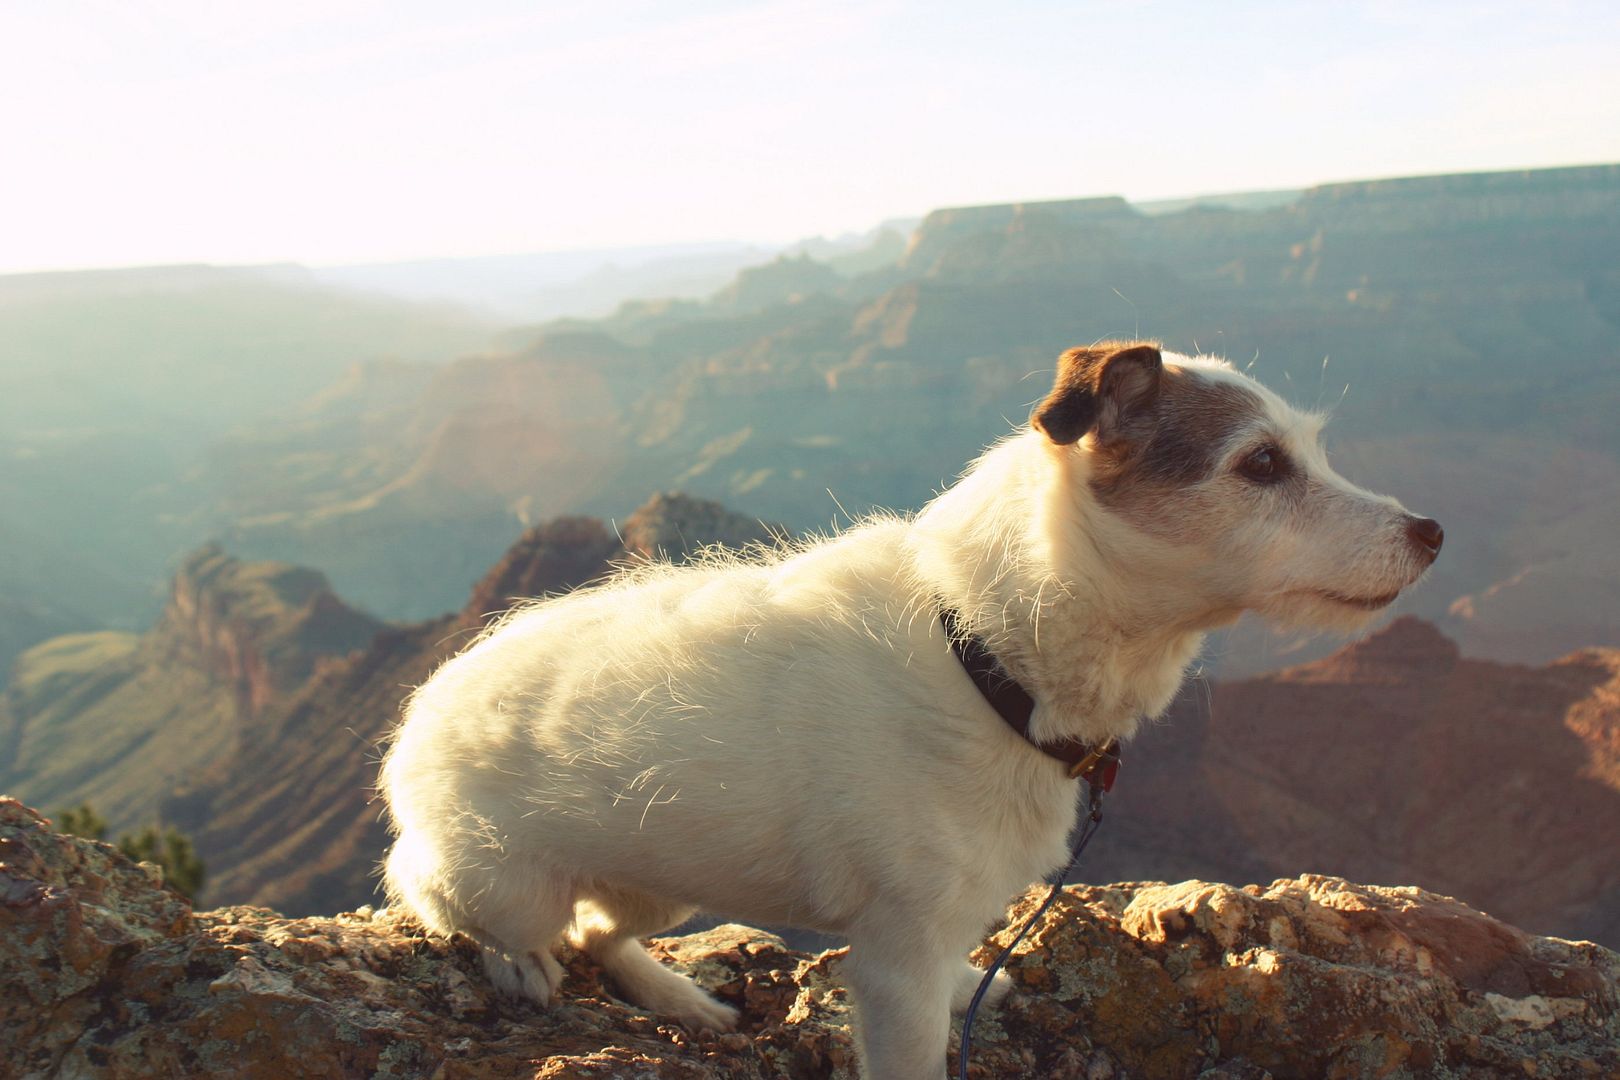
Yesterday Dan and I went to visit a litter of new five week old Corgi puppies and spent two hours playing with four baby pups and five or six grown Corgis. It was so wonderful. As we drove home I was remembering when my family got Little Bit. She was one of the puppies from my horse barn's Jack Russel's first litter. She was born during a horse show in one of the stalls. I remember peeking into the stall between classes. They named her Little Bit because she was all white with only one little brown spot on her face. We took Little Bit home to, "just try it out." She never left. A couple years later the barn's Jack had another litter and we got Pansy, Little Bit's younger sister. We lost Pansy a few years ago after she got Glaucoma. On Saturday my parents made the decision to put down Little Bit. It was strange to have just returned from playing with brand new puppies, and been remembering Little Bit in her young years, to find out that she was gone. She was one of the best dogs I'll probably ever know. Athletic, brilliant, happy. She came with me on my trip around the country and got to run around the edge of the Grand Canyon, boat with me on Lake Mead, run along the Atlantic on Tybee Island's beaches. Little Bit. Bitsy Doodle. Doodle Dog. Little Doodle. LB. She loved playing with her blue ball. We couldn't say "ball" without her ears perking up and getting excited, so we started referring to them as blue "spheres". You could throw that ball endlessly. If you didn't stop, she'd probably have run herself to death. Her ears never did fold the right way. When you threw the ball into fresh, deep snow, she's chase after it bounding through the deep snow like a gazelle, burying her nose into the snow, snorting away the snow until she found it and ran back to you with a faceful of snow, but triumphant. She loved being involved and would insist on riding in the front seat, regardless of what mode of transportation. Snowmachine? Perched in front, paws on the handles. JetSki? Same. Car? Driver's side shoved between my dad and the side window. That window was covered with wet nose marks. She even wanted to be in the front seat when we flew, but we forced her to sit on the copilot's lap. Canadian Geese used to come every year and poop all over our yard and if we said, "Geese!" LB would run down, barking, and shoo them away.
It's amazing to me how much companionship a little dog can provide. They come to you when you are crying and nuzzle their way into your arms. They have a constant smile on their faces. They love you so much they can't help but come up and lick your face. I love that there are programs that bring dogs to hospitals to soothe patients, because I can't think of anything more healing than petting a happy dog. I am sad that Bitsy is gone, but glad that she is no longer suffering. And though it is sad to see a companion pass away, I do hope that Dan and I get to bring home a dogfriend someday soon.


bella pop photography course giveaway


a Rafflecopter giveaway
FEATURED SPONSOR // skyline nail art diy from of corgis and cocktails

Hi everyone! I hope you're having a lovely Saturday! Today I'm here to share with you my featured sponsor this month, the amazing Katherine who runs Of Corgis and Cocktails. Corgis and Cocktails? Two of my favorite things! Seriously though, I'm super jealous of Katherine's adorable Corgi, Teemo. Katherine is clearly a girl after my own heart, not only does she love Corgi's and Cocktails, she also loves remixing and is a big believer that style is about expressing your creative self in a visual way on the daily through clothing. Booyah. She's also great with DIY projects and the like, so she's here today to bring you guys something fun that you can do yourself... a fun nail art DIY! My nails are tiny little things that don't get to grow out to a length that's worthy of painting due to rock climbing, so I don't get to do fun nail art, but I always see fun nail art on Pinterest that makes me wish I could! I hope you guys enjoy Katherine's nail art DIY! Katherine? Take it away!

Well hello readers of Delightfully Tacky! My name is Katherine, and I am the girl behind Of Corgis & Cocktails, a fun blog about a lot of things. You'll find me traveling the east coast in cute dresses, photographing my two adorable pups, and crafting yummy recipes over there. This post focuses on something I really love to do - nail art. Growing up, I began drawing on my nails and other neighborhood girls - everything from little fishes to bears. Thirteen years after, I'm still drawing scenes and graphics on them. I wanted to share something that didn't necessarily require a steady hand and a toothpick, so I decided this skyline at dusk idea would be the perfect starter.
You'll need to gather a few things : a pale blue nail polish(Essie in boxer shorts), a royal blue nail polish (Essie in in the cab-ana), a pure black nail polish, a clear top coat, scissors, masking or painter's tape, and a foam sponge of some sort. I use foam brushes from the craft store I pick up with coupons whenever I can. Optionally, you can use a pale cream or yellow to add on lights to the buildings at the end.

You only need a bit of your sponge - so cut off just enough to cover your largest nail (presumably the thumb).

1 - Paint your nail with the pale blue nail polish. Use two coats. Allow to dry. I often paint this shade a day before.
2 - Paint the sponge 1/3rd of the way with the pale blue nail polish. Paint the rest with the royal blue.

4 - Take a stretch of tape and begin cutting small blocks and building shapes into it. I simply made them up as I went along. Then, cut your tape to fit each nail.

5 - Place a piece of tape onto each nail. If using masking tape, you may want to press the tape against your skin or a piece of fabric first to help it not stick to the nail. Press the tape firmly onto each nail so there are no gaps. Paint over the nail - as sloppy as you want! You can always clean up your nails with nail polish remover and a q-tip afterwards! Or, usually the extra nail polish comes off in the shower the next morning if you are feeling a bit lazy ;)

6 - Once the black is dry, use a paint pen or toothpick dipped in yellow / cream nail polish to add small windows to your skyline. This is totally optional. Paint with a clear coat and allow to dry.


Q + A // what's your post processing routine?


I begin by transferring my photos from the camera to the computer and then proceed to cull out all the ones that I know I won't be using- blurry shots, out of focus shots, shots where I have a stupid look on my face, etc. Once I've cut out all the ones I know I won't be using, I go back through and look for the ones that really stand out and I start dragging those into photoshop. I like to limit my outfit photos to about 5-7 photos per post, simply because I don't feel like you guys need 15 photos of me in the same outfit. 5-7 gives me enough photos to show different poses, do detail shots, and get some variety in there. For food posts I usually do 4-6.


As far as what I actually do to photos in photoshop, I like to keep it as minimal as possible. I want my photos to look like they came straight out of the camera, and on a good day I only have to resize my photos and save them and I'm good to go! But usually I have to do some tweaking to get my photos to where I'd like them to be. Sometimes this means doing some color correction. I shoot with auto white balance, and usually the camera is good at figuring out what white balance to use, but occasionally it's a bit off, so I'll correct for that. I usually like to kick up the contrast and brightness a bit. I like to use Totally Rad's Punch Out and/or Clarify actions for my photos if they need a bit of a boost, and I usually dial them back a lot. The nice thing about actions is that you can go in and edit how strongly each element acts, so I usually play around and get it looking just right. Sometimes I give my photos a bit of a touch of a matte look, because, you know... it's like "in" these days. Haha. No I like how it looks, but not always. It depends on the photo set and how I want it to look.


I personally find too much post processing to be a bit distracting. I prefer clean, crisp photos that don't look like they've been ran through 5 instagram filters. When it comes to post processing, my philosophy is to try and get it as right as possible straight out of the camera, and then if I need to make a couple tweaks to color or contrast to make the photo look its best, then I'll do it. The less time I have to edit my photos in post, the more time I have to write and come up with other fun stuff to share on the blog.
Do I think post processing is necessary to create beautiful images? No. But it can definitely help, especially if you're a beginner and still figuring out how to make all the settings on your camera work (which can be daunting). You can fix exposure errors, white balance errors, and even photoshop out trash cans in the background if you want! Ultimately a photographer's goal should be to do as much in camera as possible to create the perfect image, but the beauty of digital is that we do have the option of editing in photoshop.
*an "action" is basically a set of filters you apply to a photo. So when you apply a specific action, it takes adds a set of filters and/or edits to your photo automatically, and you can then go in and edit how much of those filters you want to show. So the Clarify action I use frequently ups the brightness and contrast a certain amount, which I can then adjust manually to suit the photo. For more info on actions, click here.
Want more photography help? Check out these photography related posts: My Cameras (I've since acquired a Canon 6D which I'm hoping to review after using it a bit more), Should I invest in a great camera body, or great lenses?, and Tips for taking your own outfit photos.

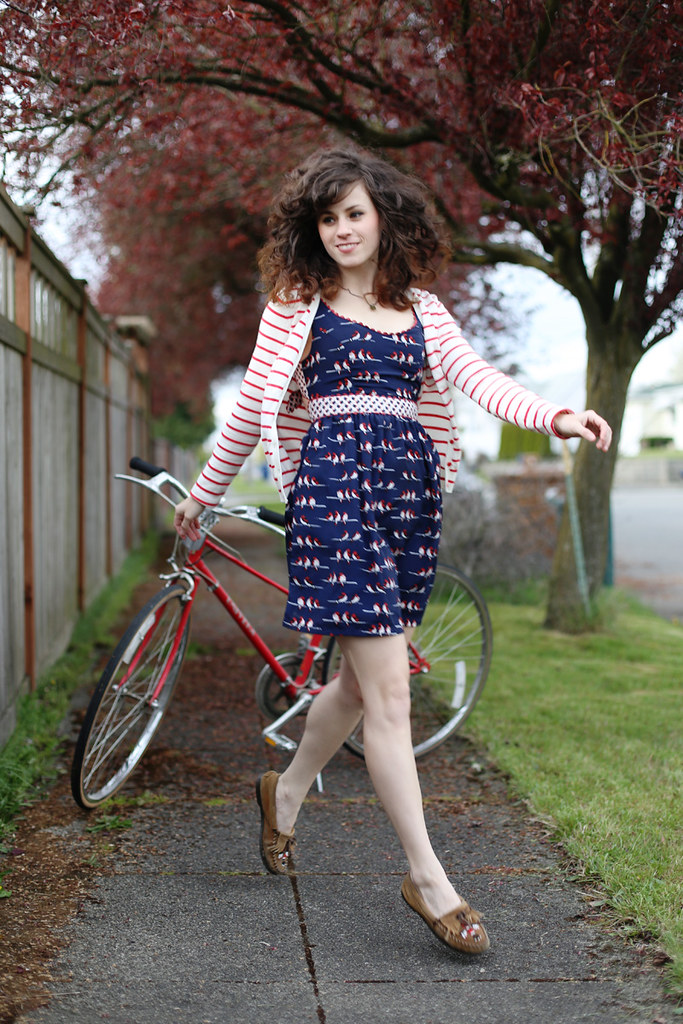
going for a spin


Hi, I’m Liz
I'm an artist, writer, designer, DIY renovator, and … well basically I like to do all the things. If it’s creative I’m probably doing it. I’ve spent over 30 years voraciously pursuing a life steeped in creativity and I wholeheartedly believe creativity and joy are inextricably linked.
Read more…


Explore The Archive
- July 2025
- May 2025
- January 2025
- December 2024
- August 2024
- July 2024
- May 2024
- April 2024
- January 2024
- December 2023
- October 2023
- September 2023
- July 2023
- June 2023
- May 2023
- April 2023
- March 2023
- February 2023
- January 2023
- December 2022
- November 2022
- October 2022
- August 2022
- June 2022
- May 2022
- April 2022
- March 2022
- November 2021
- October 2021
- August 2021
- July 2021
- May 2021
- January 2021
- November 2020
- October 2020
- September 2020
- August 2020
- July 2020
- June 2020
- May 2020
- April 2020
- February 2020
- January 2020
- November 2019
- October 2019
- August 2019
- July 2019
- June 2019
- May 2019
- April 2019
- February 2019
- January 2019
- December 2018
- November 2018
- October 2018
- September 2018
- August 2018
- July 2018
- June 2018
- May 2018
- April 2018
- February 2018
- January 2018
- November 2017
- September 2017
- August 2017
- July 2017
- June 2017
- May 2017
- April 2017
- March 2017
- February 2017
- January 2017
- December 2016
- November 2016
- October 2016
- September 2016
- August 2016
- June 2016
- May 2016
- April 2016
- March 2016
- February 2016
- January 2016
- December 2015
- November 2015
- October 2015
- September 2015
- August 2015
- July 2015
- June 2015
- May 2015
- April 2015
- March 2015
- February 2015
- January 2015
- December 2014
- November 2014
- October 2014
- September 2014
- August 2014
- July 2014
- June 2014
- May 2014
- April 2014
- March 2014
- February 2014
- January 2014
- December 2013
- November 2013
- October 2013
- September 2013
- August 2013
- July 2013
- June 2013
- May 2013
- April 2013
- March 2013
- February 2013
- January 2013
- December 2012
- November 2012
- October 2012
- September 2012
- August 2012
- July 2012
- June 2012
- May 2012
- April 2012
- March 2012
- February 2012
- January 2012
- December 2011
- November 2011
- October 2011
- September 2011
- August 2011
- July 2011
- June 2011
- May 2011
- April 2011
- March 2011
- February 2011
- January 2011
- December 2010
- November 2010
- October 2010
- September 2010
- August 2010
- July 2010
- June 2010
- May 2010
- April 2010
- March 2010
- February 2010
- January 2010
- December 2009
- November 2009
- October 2009
- September 2009
- August 2009
- July 2009
- June 2009
- May 2009
- April 2009
- March 2009
- February 2009
- January 2009
- December 2008
- November 2008
- October 2008
- September 2008
- August 2008
- July 2008

VISIT THE SHOP


PRIVACY POLICY & DISCLOSURE
We are a participant in the Amazon Services LLC Associates Program, an affiliate advertising program designed to provide a means for us to earn fees by linking to Amazon.com and affiliated sites.